Author Topic: CZ-75 Trigger jobs  (Read 254505 times)

0 Members and 1 Guest are viewing this topic.

Walt-Sherrill

  • Guest
CZ-75 Trigger jobs
« on: September 28, 2006, 03:44:54 PM »
This information was first offered by a forum member several years ago.  More recently, another member resurrected the materials and I posted it for him.
           
            We dont have the name of the original poster to thank.  If anyone know who did this, let us know.  If anyone sees ways of improving the procedures, let ME know that.
           
            Recommended tools:
           
              The CZ-75 Owners Manual
              Dental pick
              3/32 punch
              Smooth workspace and floor with good lighting (helpful in finding lost springs.)
           
           
            Step 1:  Field strip the weapon, removing the slide from the frame.  
           
            Step 2:  Locate the sear spring (part 12, in the manual) and, using the dental pick, gently pry the spring from its not in the safety (part 29).  
           
              This spring retains the safety.  The safety holds the ejector/sear assembly in the gun.


            Step 3:  Fully cock the hammer.
           
            Step 4:  Hold the Ejector in place with your hand while working the safety on and off as you pull it out.
           
              Note: there is a small, spring-loaded detent mechanism that can be lost, so watch for that small piece and spring as you remove the safety.  These are the Safety Detent Plunger and Spring (parts 30 and 31).  You have to push them BACK, out of the way, while removing the safety.
           
            As you remove the safety, the ejector will be pushed forward by the hammer.
           
              If the safety doesnt want to come out, theres a chance the sear spring has fallen back into its locking position.   Check the spring.
           
            Step 5:  Remove the ejector.  
           
            Heres the ejector assembly removed from the gun.


            Step 6:  Use the punch to push out the sear pin (part 13), but leave the punch in position.
           
              Before removing the punch from the ejector, close your hand around the assembly to prevent the springs from flying loose when you remove the punch.  
           
              Once youve removed the punch, dump the parts out to be sure they are all there.  Heres a picture of the various parts.


              Ejector (part #10)
              Sear (#11)
              Sear spring (#12)
              Sear pin (#13)
              Firing pin block lever (#14)
              Firing pin block lever spring (#15)
           
            Find any missing parts before you continue!
           
            Note:  If you cant find the firing pin block lever spring, you can make one yourself from the spring wire of a ballpoint pen  but its not quite as good as the factory part.  (Call CZ-USA for the part.)
           
            Step 7:  Remove the Safety Detent Plunger and Spring (parts 30 and 31)  These are easy to lose, so be careful.  (Youll have to push them back and to the inside of the frame when removing them, so be careful.)
           
            Step 8:  Remove the Hammer Pin Retaining Peg (part 19).  You may be able to do this with your finger on the outside of the frame.  If not, you can push it out with a pick.
           
            Step 9:  Remove the Hammer Pin (part 18) .  The Hammer Pin can only come out from the right side of the frame to the left.  
           
              We havent removed the mainspring, so this is still under tension.  To make this easier, push DOWN on the hammer while removing the pin.


            The hammer will now swing clear of the frame, and you can access the hammer hooks.


            Step 10:  Polishing!
           
            You want to smooth the sear, Ejector and Trigger Bar (part 7) on all surfaces that rub against metal.
           
              A mirror finish is not needed, but is OK.  You certainly want to remove any machining marks.
              Warning: taking off too much means youve got to buy a new part!
           
            Polish the areas marked in red.


Offline KonigsTigerII

  • Newbie
  • *
  • Posts: 5
CZ-75 Trigger jobs
« Reply #1 on: December 18, 2006, 12:57:05 AM »
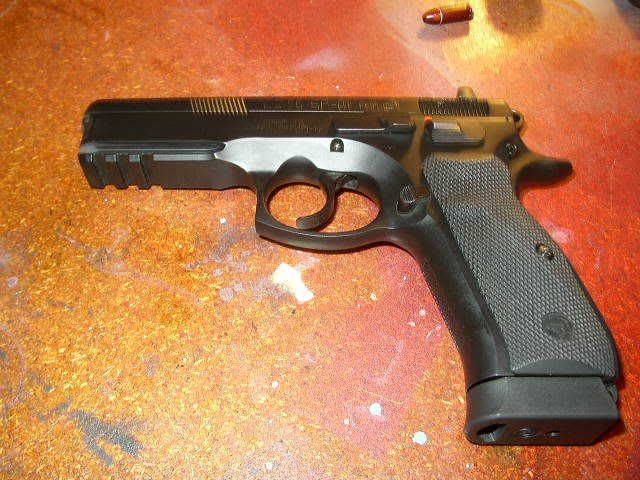
Hello, kinda new to the forum, usually on sksboards.com, but I own a SP-01, CZ-85B and a CZ-52, and I would like to share some info on an easy trigger job, enjoy!
           
            This is my first detailed how to, so if anything is missing, confusing, etc let me know. Also this is do at your own risk, and remember to go slow and take off little bit at a time. Its much easier to remove material than to add it. I recommend reading thru the whole thing before attempting. While taking the pistol apart, it is a very good idea to take note of the postion of the parts and how they work together.
            Also note CZ triggers usually need to break in (around 500 rounds) and the trigger will improve during break in, if this is not enough for you, then this may be of help to you.
            This was done useing a CZ-75B SP-01, models with a decocker will be different than this one with a manual safety. I plan on doing this to a decocker model, but I don't have one...yet.
           
            The tools I used are:
            picks (like dental picks)
            Punch
            phillips screw driver
            sand paper (400 grit I found works well)
            and a paded vise
           
           
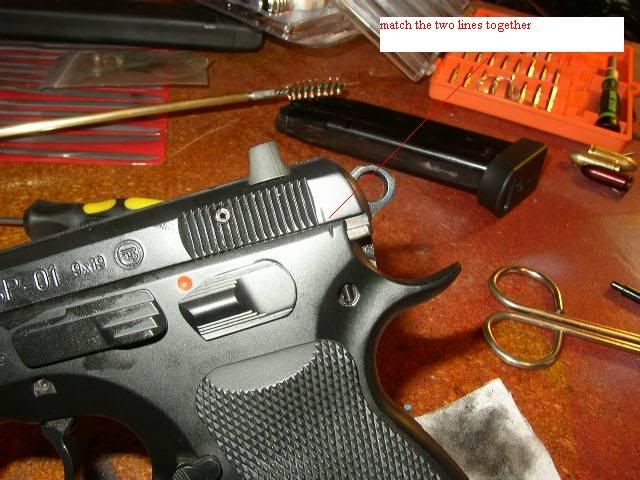
            First off you need to unload and field strip your pistol


            Remove the magazine, then align the two lines on the rear of the slide:


            Push out the slide stop
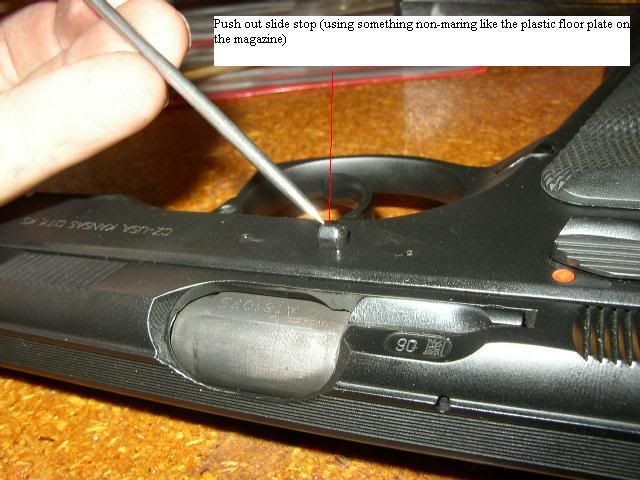


            then pull it out


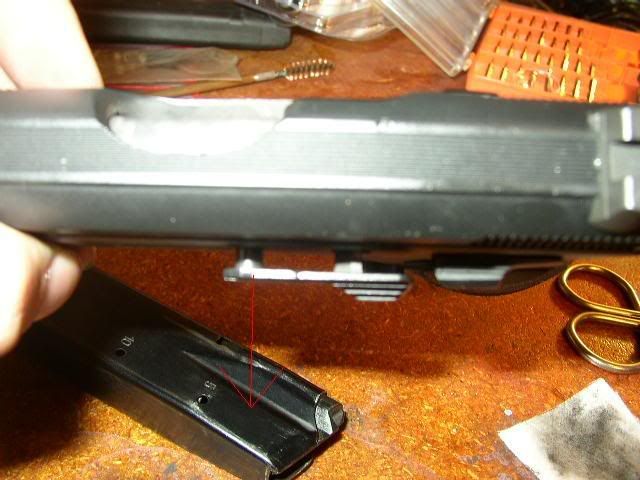
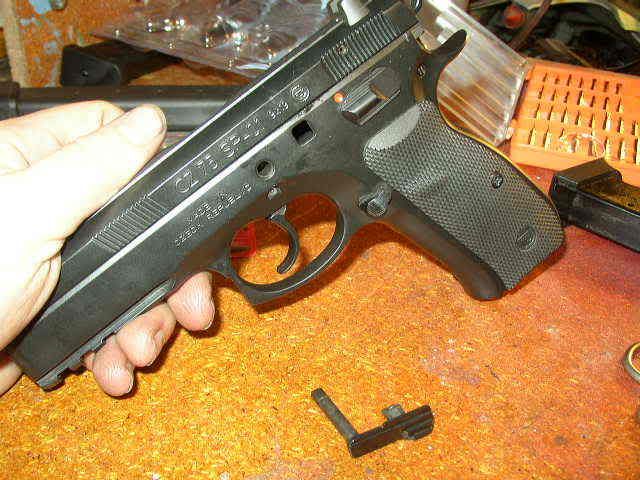
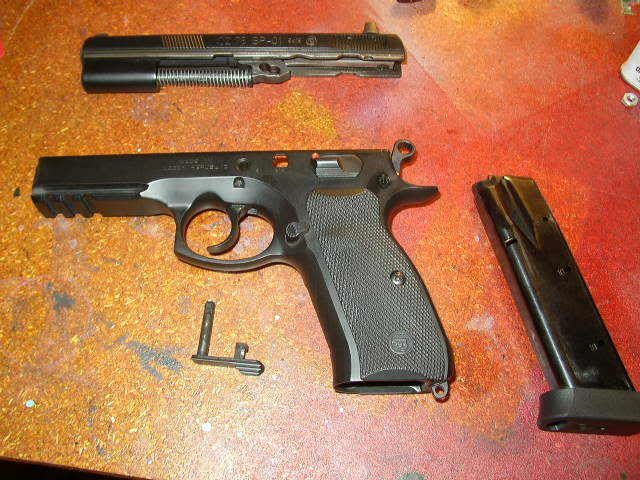
            The slide will now pull off towards the front, removing the barrel and spring is not required for a trigger job


            -----------------------------------------------------------------------------
           
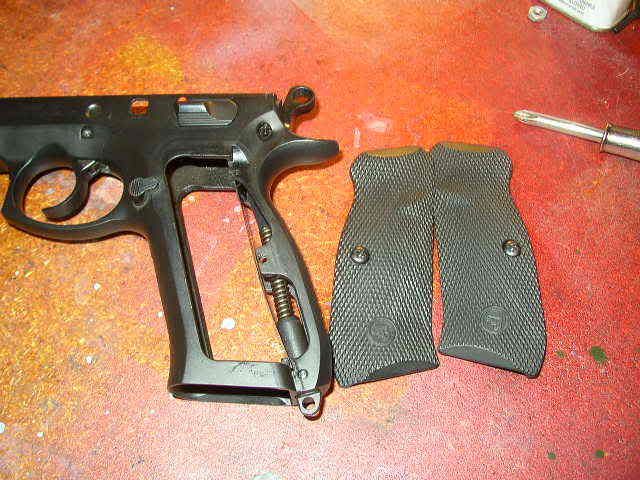
            next remove the grips using a phillips screw driver


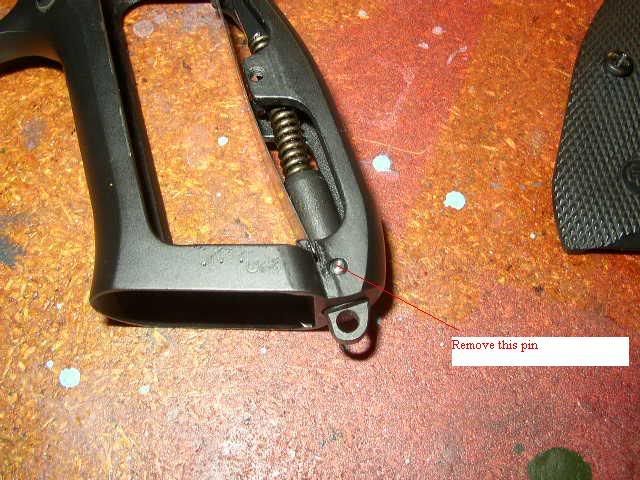
            remove the mainspring plug pin (under pressure, push the plug against a table or simlar surface while doing this)


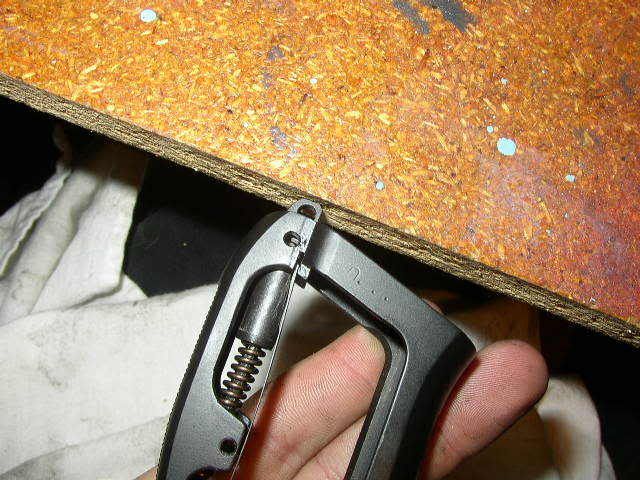
            then carfully take out the magazine break like so lifting up and pulling forward:


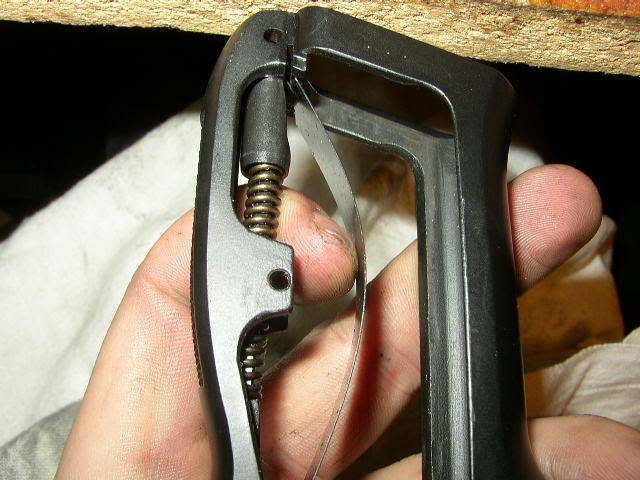
            Then release the mainspring plug


            Pull out the plug and mainspring


            ----------------------------------------------------------------------------
           
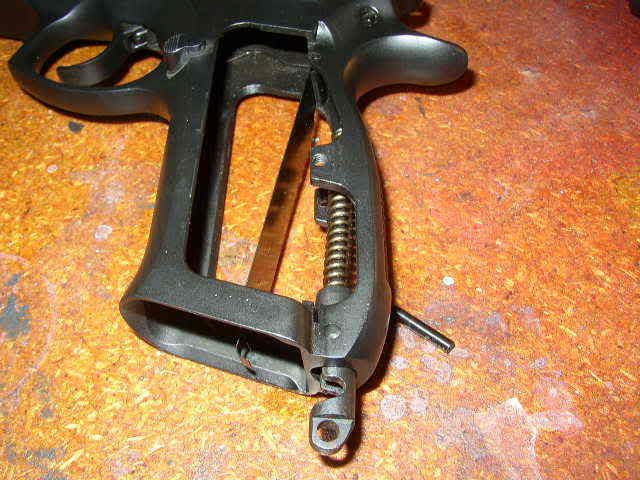
            Next lift up on the sear spring


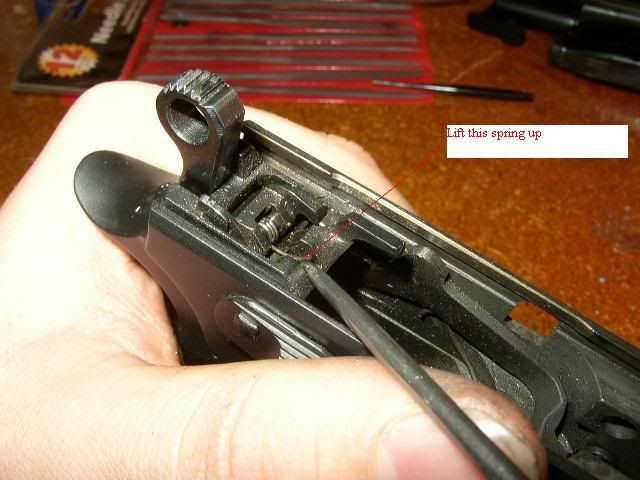
            while lifting up the spring pull out the safety (helps if its on safe to give more to grab onto) The CZ-85B you have to pull out both sides of the safety


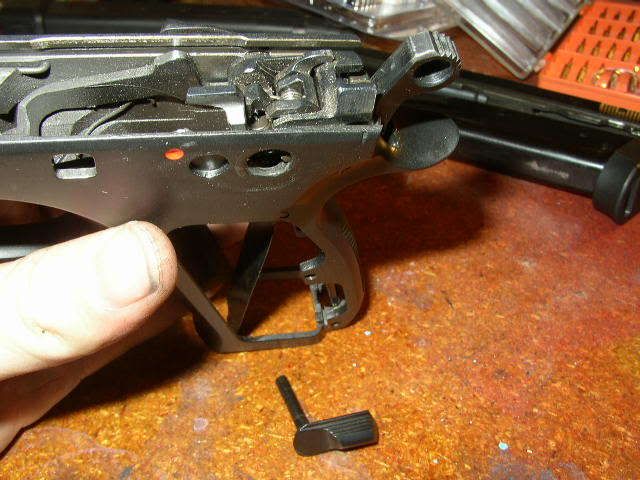
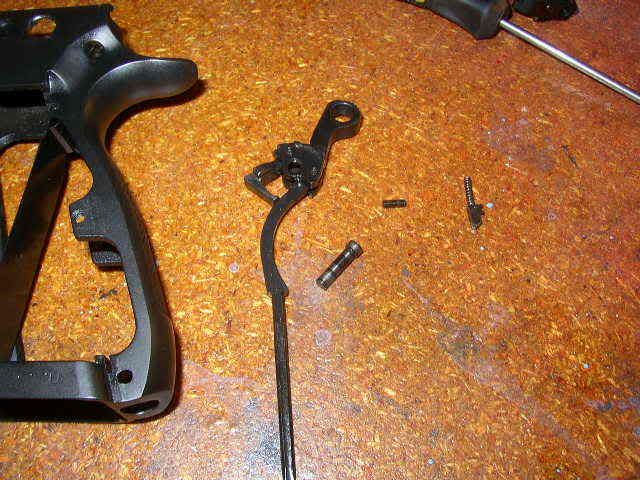
            lift out the trigger assembly
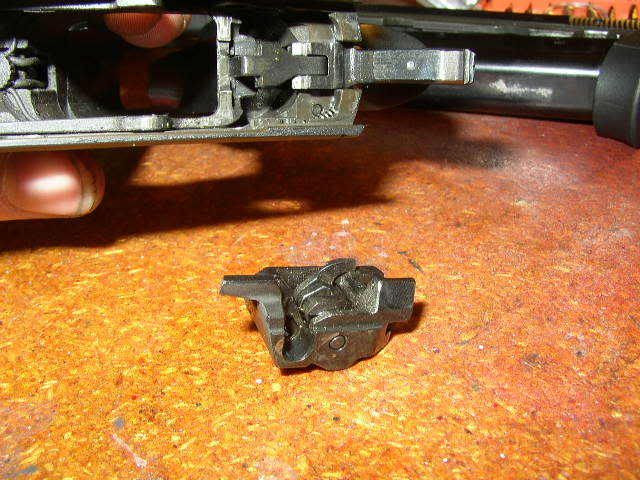


            Remove the sear pin


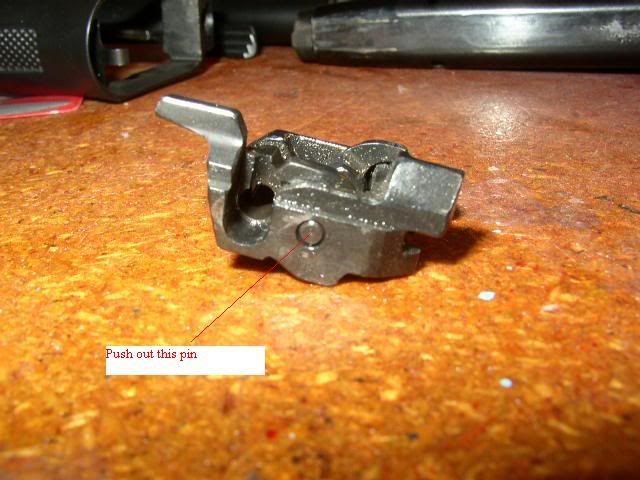
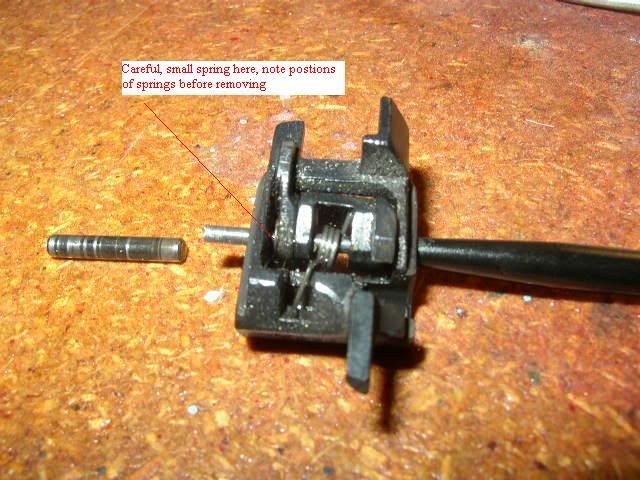
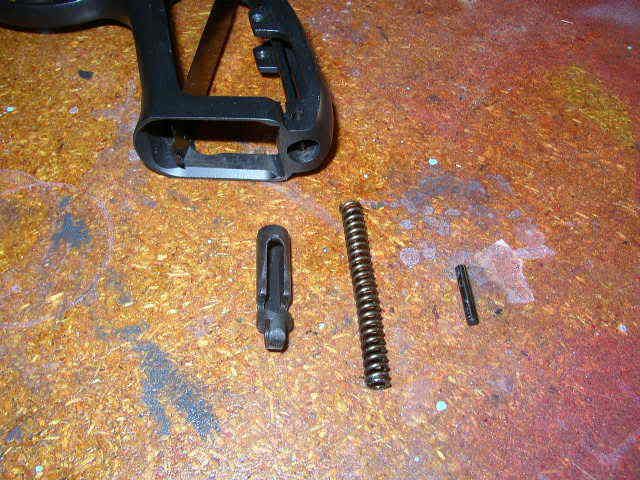
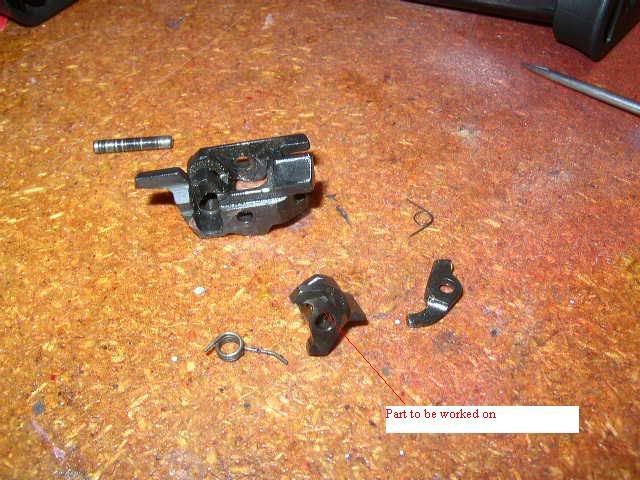
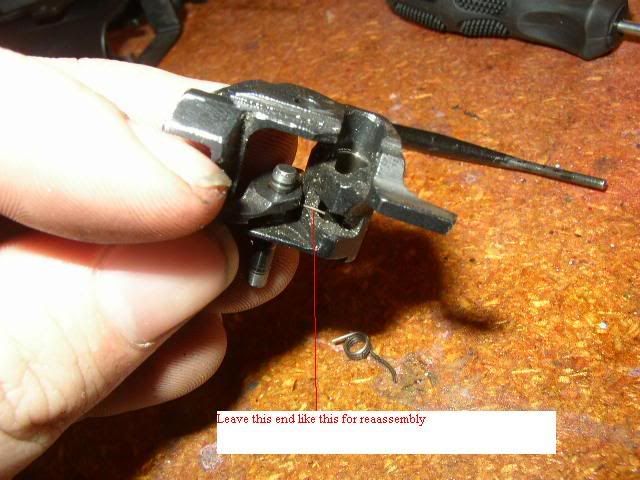
            taken apart, be careful of the two small springs in it (sear spring and firing pin block lever spring)


            ------------------------------------------------------------------
           
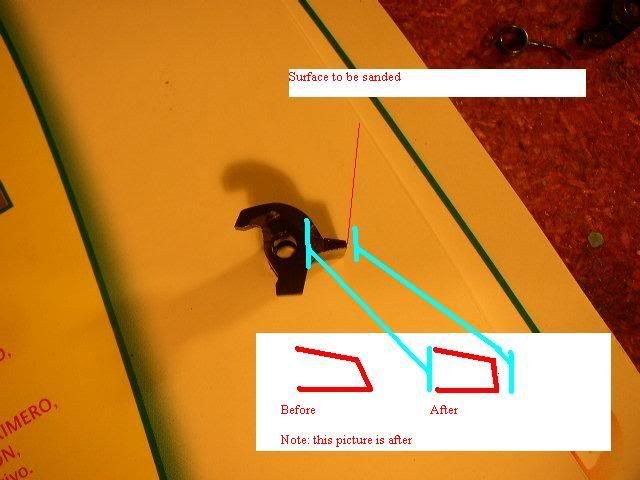
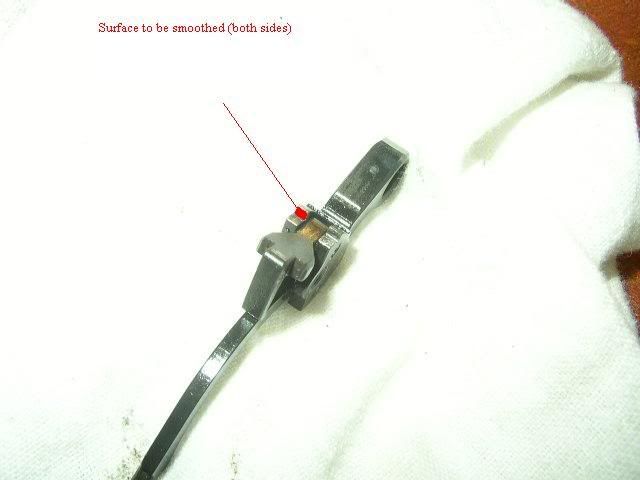
            Next sanding on the sear. I use 400 grit paper and found it to be effective, while sanding I found putting the paper on a flat surface and carfully taking the sear across it the best way do sand it down, though other ways such as using a vise may also work. Also do not round any corners off!
           
            The part to sand, this is after and it gives good trigger pull and weight. Do a little bit at a time to be safe, an note hammer engagement. When the trigger is pulled in single action, if the hammer moves back before releasing this is positive engagement (safest), if it doesn't move its neutral, and if it moves forward, negative (most unsafe). My goal is to have minimal postive engagement, though neutral may be desirable for a target oriented pistol)


            Now reassembly of the trigger assembly (basically reverse order)


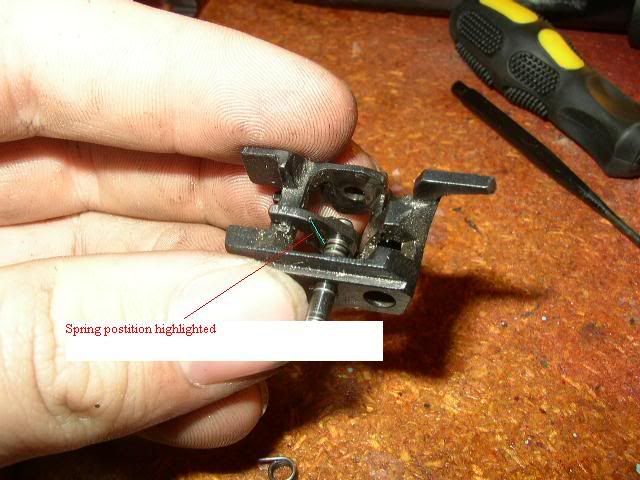
            Leave firing pin safety lever spring like this for reassembly...


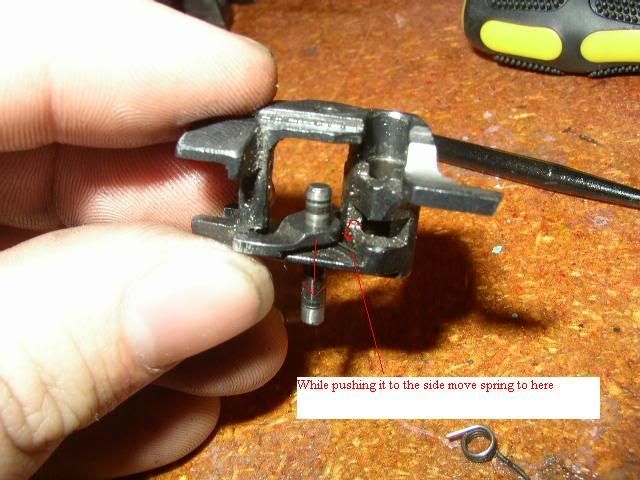
            Then while carfully pushing lever towards its side move spring to its correct position
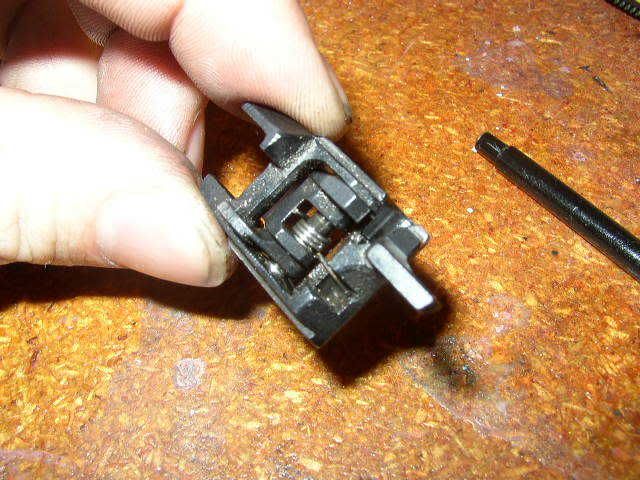


            Reassembled


            --------------------------------------------------------------------------------
           
            Next is to get the hammer out
           
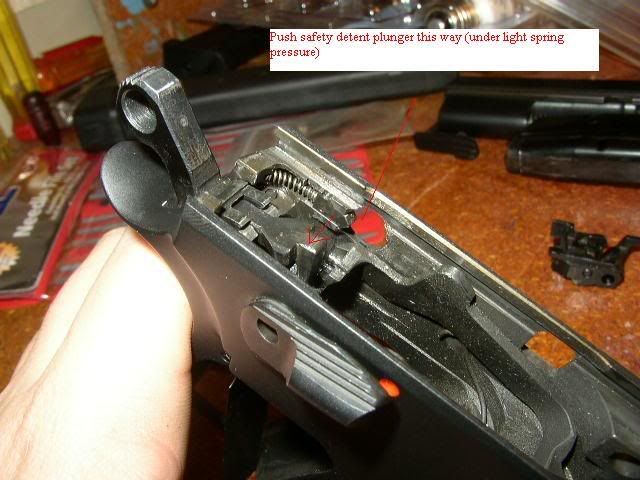
            Push the safety detent plunger inward


            and remove


            next is to remove hammer pin retaining peg


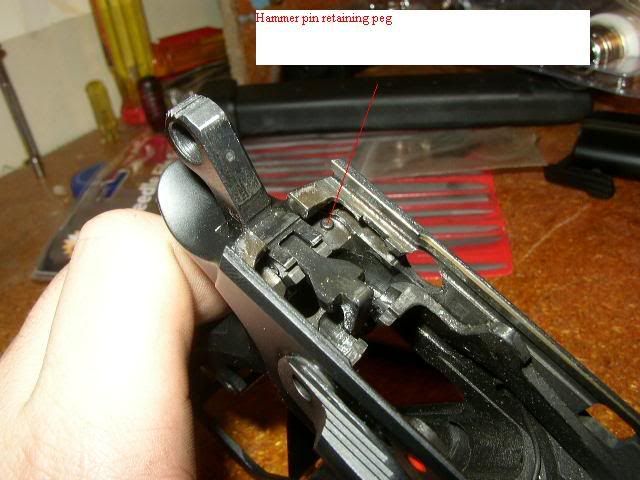
            Push up on it from here


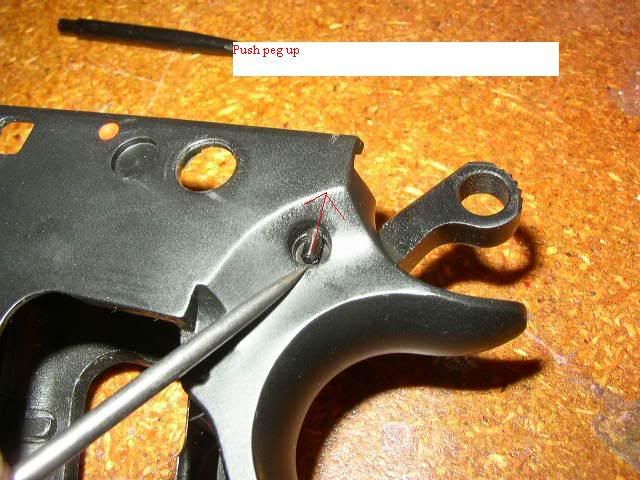
            then pull out from the top using tweezers


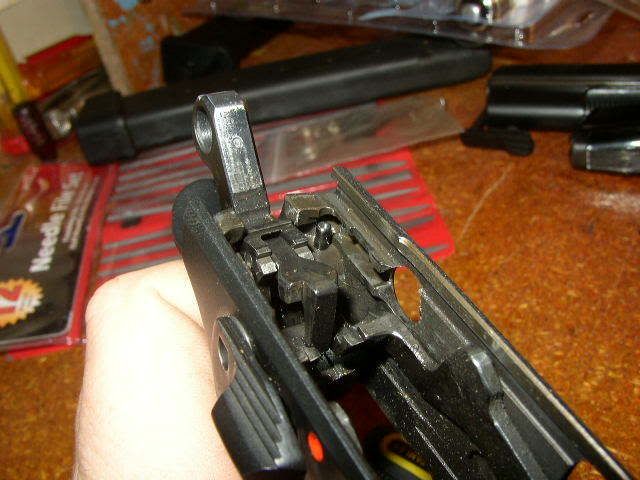
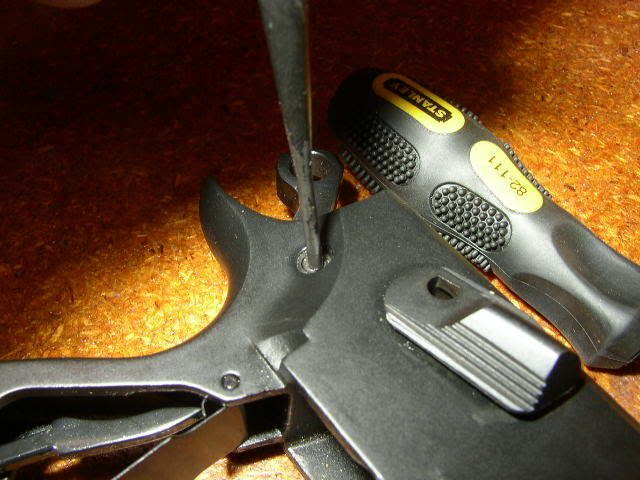
            Push out the hammer pin


            pull the hammer assembly out of the top


            Shows the surfaces to be smoothed, also don't round any edges. I would recommend keeping the angles the same here too, can be angled backwards but I recommend against it, as it may cause negative engagement


            ----------------------------------------------------------------------------
           
            Reassembly is just reversed, but with a few helpful tips
           
            Lift this spring when putting safety back in


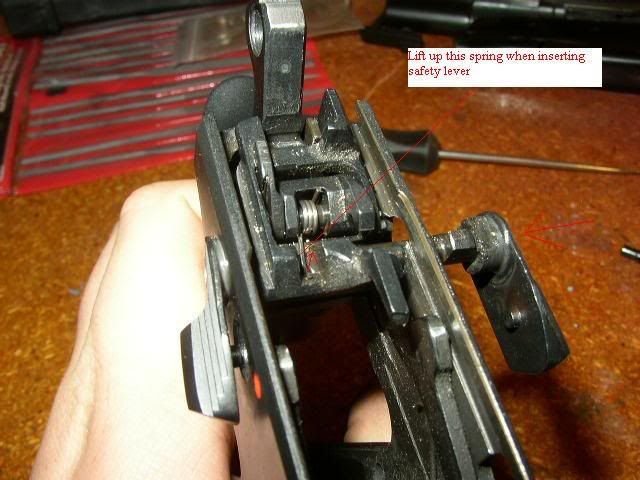
            then push back the safety detent plunger back far as you can, while pushing safety back in.


            Then reversed order on the main spring and grips and slide.
            The mainspring also may be changed too as well to help with trigger pull, especially with double action. I used a Cz-52 spring since I have extras and found them to be reliable, you can get the same effect as cutting coils off, but that is un reversable and you may make it too light, you can get lighter springs here:
            www.gunsprings.com/SemiAuto/EAANF.html
           
            Then as usual function test the pistol and safety.
           
            I hope this helps make your CZ trigger much better. I have tried my best to make it clear and concise, but let me know if you run into any snags while trying this.
           
            -Sterling

Offline KFD147

  • Sr. Member
  • ****
  • Posts: 953
    • Hammer Down Sports
Re: Trigger job for BD/Decocker guns
« Reply #2 on: September 02, 2008, 11:33:31 PM »

CZ-75BD, P-01, 40P Decocker Disassembly

First of all make sure your firearm has its magazine removed and is not loaded. Remove the slide and disassemble the grips, mainspring pin, cap and magazine brake with pin. It appears they have changed the design a little. Even though the parts diagram, at the back of your owners manual, shows a part #63 fixing disc, this gun does not have it. The 3mm sear pin is simply staked on the left end (under the decocking lever). The 3mm (.118 inch) pin is straight and the hole in the right side of frame is a little undersized to keep the pin from going out that way. It must be driven out from right towards left after removing the decocking lever. Before you start and to make it easier go ahead and make a slave pin to push out the sear pin without parts flying and getting lost. A .110 inch slave pin .670 inch long made from #35 drill bit or something similar will work. Make sure you taper the ends of the pin, so it will slide in easier.


Here is a picture of the left side of a P-01/ 40P frame. Notice the opening where the sear pin is. This is where part #63 the retaining disc goes. Take a small punch and tap it to the left to remove it. Here is where you can use the slave pin to tap out the sear pin from the right side and remove the sear/ extractor cage with the sear and springs intact.


Here are a couple of pictures of a decocker hammer. The sear engages only on the right side hook and the left is shorter for the decocking lever to work.


Use the trigger job directions in the Gunsmithing FAQ to further disassemble and polish the parts needed for a smooth trigger job. This is already posted so I will not go into the directions. Don't forget to remove and polish the firing pin block. It may be very difficult to remove the FPB roll pins, but it is well worth the time and effort.

When you are putting everything back together, make sure when you place the sear and springs back in the sear/ ejector cage to place the sear spring behind the decocking lever as shown below. Watch to make sure the springs are in the right place.
(pic from Double Pedro, Thanks)


I used a .110 inch slave pin .670 inch long made from #35 drill bit. This will just fit the right side hole when sear pin is pushed in from left side. I know some BD?s have a fixing disc holding the sear pin in and the right side hole is much smaller. Also, pictures of a 40P/ P-01 decocker look different on left side of frame. Make sure you perform a function check on the pistol with it fully assembled to make sure it operates properly.

It took me several hours to disassemble my 40P and reassemble for the trigger job, since this was my first time. Also a slave pin makes all the difference. It now has a super smooth double action trigger pull and a great single action pull. I plan on performing the same to my P-01, but will eventually have Angus put a competition hammer on it. I want to thank all the previous posters that posted directions and pictures that helped me disassemble my pistol without hesitation. Thanks.

Jason 8)
www.hammerdownsports.com
Copperas Cove Pistol Club Member
Temple Gun Club Pistol Match Director
Capital Area Practical Shooters (CAPS) Member
USPSA Member
CZ-USA supporter

Offline HankC1

  • Jr. Member
  • **
  • Posts: 77
Re: Trigger job for BD/Decocker guns
« Reply #3 on: September 03, 2008, 08:19:03 PM »
Also reference to the original posting.

http://www.czforumsite.info/index.php?topic=17104.0


anything