I have been making the shims smaller thinking that less mass might reduce the problem with them "letting go" under recoil. This approach was not working as I was having problems in particular with the rear trigger shim and to a lesser extent the disconnector shim as well.
As I was pondering this, I think I figured out problem. 95% of a solution is a good understanding of the problem. That way I can attack the root cause (why?) vs. the symptom (the shim breaks loose).
Play with the trigger assembly. "Fire" the hammer, then with the trigger still held all the way back, press the hammer back into place. The hammer is caught by the disconnector. Hmmmm.....
Consider that with a "full auto" trigger pack, the evo is rated at about 20 rounds per second. That means the firing sequence is really getting that hammer moving with quite a bit of energy, even for us who are only firing one shot at a time.
"Catching" the mass of the hammer, especially in the actual firing sequence is quite hard on the disconnector. I have seen posts were certain versions of the disconnector have actually broken due to this "catching" stress. The disconnector is not the only thing being affected here. The disconnector shim also absorbs this "hammering", which can break the epoxy bond.
I see the CZ custom shop hammer has a big hole in the middle of it to reduce the weight. Likely, this speeds up the time from trigger release to impacting the firing pin. In view of the pounding the disconnector takes catching the hammer, I can see where lightening the hammer would be helpful to reduce the pounding going on to the trigger assembly.
Likewise, after the hammer is "caught" by the disconnector, releasing the trigger causes the disconnector to release, releasing the hammer, which then is "caught" by the trigger hooks. You can hear the trigger reset as it seems to catch with a lot of force. This is the force of the trigger spring plus the force of the hammer spring plus the force of the firing pin safety as applied to the lever arm near the hammer accelerating the weight of the hammer into the trigger hooks. The trigger hook then instantly stops the hammer acceleration dead in its tracks until the next time you pull the trigger.
Again, this "catching" action by the trigger hooks is carried to the rear trigger feet. This "catching" action is like "whacking" the rear trigger shim with a small hammer each each time the trigger is released and the trigger hooks need to catch the rapidly accelerating hammer. The force of this acceleration can be felt if you try to stop the trigger from "snapping" forward after the trigger reset.
Thus the problem is not "recoil shear force" like I originally thought, but rather pounding from the trigger and disconnector feet onto the top of their shims.
Thus, it seems to me
the solution to this problem (pounding of small trigger/disconnector shims until the epoxy breaks) is to use a physically longer and wider shim. Thus, even if the epoxy directly under the trigger and disconnector foot were to be pounded to dust, the metal further away from the point of impact would remain firmly anchored down.
At least that is the theory.
The trigger over travel shim does not take any pounding (just the user trigger pull force) and thus can remain fairly small.
The shims I first started out with were longer and wider and seemed to work fine, but the more problematic ones lately have been the smaller versions.
From what I am reading (see 3M white paper
http://multimedia.3m.com/mws/media/774716O/mechanicals-versus-structurals.pdf?&fn=MechanicalsVsStructurals.pdf), "modern" two part, slow drying epoxy glues can be better than screws, rivets, spot welds, or welds. JB Weld falls in this classification with a gripping power of almost 4000 PSI. These shims are stoutly attached.
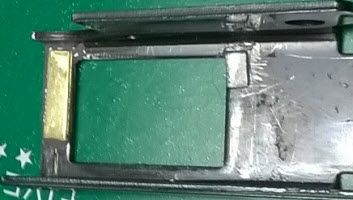
Here is the trigger shim (0.032") and smaller trigger over travel shim (0.013")

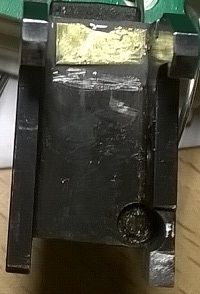
Here is the disconnector shim (0.016") on the trigger shelf. It could perhaps be a bit wider:

Excess epoxy is shown here. After a few hours the slow dry epoxy gells up and the excess can readily be removed with a toothpick.
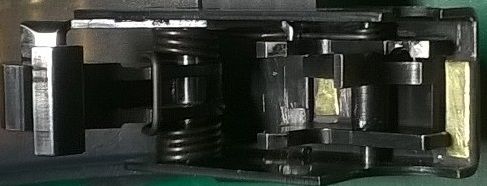
Here is everything thing in the trigger assembly after clean up and drying overnight. The rear trigger shim is deliberately just short of the second trigger foot. I want pounding from one end only, not both ends.

I will run it by the range and see how it does probably Monday.
- DanT Phoenix, AZ