Author Topic: Project "C-100" how to smooth a Tristar/Canik Long thread lots of pictures!  (Read 157295 times)

0 Members and 2 Guests are viewing this topic.

Offline terry mc

  • Sr. Member
  • ****
  • Posts: 680
PART 2 GRIPS AND HAMMER INSTALL

Okay,
Tonight is going to be cut a little short as work has interfered.

But I do have a couple things.

One many of you have noticed that the CZ grips do not fit quite right, others have manage to convince them to fit, myself included on the Stingray.

I notice on the C-100 that the grips fit terribly last night so I started looking closely at where they interfered.
I could get the screws to line up but the grips at the rear of the frame gaped, so I checked the dovetail at the front to see if I had good lockup at the front.
Affirmative, we have good lockup!
Looking at the butt of the gun I could see the problem and maybe this is why others have had fitment issues.


In that photo you can see that the CZ grip has a long radius cut to the grip and the C-100 has an almost squared off frame causing interference.
If you slide the grips back to where the holes for the grip screw does not line up you can get the grip to fit flush at the back.
Seeing at I have these nice grips I did not want to modify the hole location so I came up with a different solution.

RECUT THE INSIDE OF THE GRIP TO MATCH THE FRAME ANGLE.

It took a lot of slow cutting, after all I did not want to destroy my new grips, But I gradually got the contour correct on both grips.

SLOW IS KEY HERE, LOW DREMEL SPEED AND SLOW SMOOTH HAND MOVEMENTS! it is too easy to slip and gouge the wood.

Big difference


Special note here, I may look at thinning and fitting the grips from the inside more at a later date to get them thinner.
Thin they are not, 1.45" across so just about exactly the same width as the stock grips.

The other thing that I did manage to get done is get the hammer installed.

As with your other work first safety check the gun, then remove the slide.
Next remove the grips, and remove the Hammer spring as in part 1.

Next you need to remove the safety.
The Canik/Tristars have a detent safety, meaning they have a spring and ball on the back side of the safety that may fly off if you are not careful.
They differ from CZ on this as CZ has a catch inside the gun that can be pulled back with a dental pick.
First step to remove the safety is down in the sear cage the Sear spring rests in a slot and the safety has a slot that the sear spring slides into locking the sear into the gun.


As you can see I use a dental pick to lift this spring, and once it is lifted you move it to the left or what would be down in this picture and rest it up out of the slot.
Next step is from the right side of the gun use a drift punch to slowly PRESS (NOT hammer) out the safety toward the right side.
If you get rough you will be looking for replacment parts for this small ball bearing and the spring behind it.


OKay now the safety is out the next step is to remove the sear cage, this can be done by moving the sear cage forward toward the trigger, as it is slotted in there. it will lift out set it aside and make sure that it is somewhere that nothing can get lost or knocked around.

PERSONAL TIP HERE; I like the small magnetic mechanics parts cups. They keep all your parts together and even if you knock them over they will keep most items in there.

With the sear out of the way, there is another item Canik does different than the CZ75's for the hammer pivot pin they use an internal locking pin instead of the external one on the 75's, this is just like the RAMI's only harder.
I found the pin so short it is flush inside the gun with no way to press it out or get a grip on the pin.
So cringing, I turned the gun upside down, held the hammer back (remember no sear to hold it in place) and tapped my wood work bench thru a towel with the frame of the gun. I was successful the pin came out onto the towel.

Be careful it is tiny!


Here is the hole that was left by the pin.


Now you want to drift the hammer pivot pin out from to right side of the gun toward the left side.
Mine took a fair amount of tapping as it was in there pretty tight. Use a small hammer for these tasks, I use an 8 oz. ball peen to tap with.
This is not framing, closer to watchmaking, so not too hard.


Once the pivot pin is fully removed, the hammer assembly will lift out.


Once the hammer assembly is out, I lay the new hammer in the same direction, as the hammer assembly side by side.
I remove the disconnect from the old one and install on the new one with the new hammer pin from CGW. Then I remove the hammer spring arm off the old one and reinstall on the new one SAME DIRECTION a lot of people tend to flip this over and if you do it will not fit back into the gun until you fix it.
Install the new hammer pin on the arm and you are ready to reinstall the hammer and disconnect.

Once it is reinstalled you can reinsert the hammer retaining pin, I had to drift it back in, then reinstall the hammer pin retainer.
I actually found it fairly easy to put back into the hole as it slide right back in.
I used one of my dental picks that has been magnetized to place the pin back in place, and then pressing it back down.


ONE RACEHAMMER INSTALLED. You may have noticed this one is a Stainless, with the HC slide and the 85C trigger I thought this would fit better with the overall look of the gun. So I asked David aka Schmeky and he made me a custom hammer kit with a stainless hammer.
At this point it should be noted that Canik has changed a couple of other dimensions on their guns,  in this case I am referring to the hammer pivot pin and the trigger pin, David has informed me that the increased the size of those 2 pins.
« Last Edit: May 07, 2014, 09:43:05 PM by terry mc »
Terry Mc
Gloss Blue CZ-97BE-SAO

CZ Scorpion CZ Custom Trigger Pack, Streamlight TLR-1HL Primary Arms MD-ADS

CZ75 Shadow 9mm SAO

Offline terry mc

  • Sr. Member
  • ****
  • Posts: 680
Terry, make yourself one of these tools. It will make servicing that hammer spring and mag brake a LOT easier.

http://www.czfirearms.us/index.php?topic=51650.msg316253#msg316253

Joe
Your right Joe and I need to get the Joe Tool as well, as much as I keep doing these projects.

Terry Mc
Gloss Blue CZ-97BE-SAO

CZ Scorpion CZ Custom Trigger Pack, Streamlight TLR-1HL Primary Arms MD-ADS

CZ75 Shadow 9mm SAO

Offline p4R4d0x

  • Full Member
  • ***
  • Posts: 185
    • Staufhammer Photography
p4R4d0x,

About the grips ai did not answer you before as I wanted to pull the grips I had to show differences.
Here is a picture of the  2 side by side.

You can see in this shot that the Tristar is more of a full body grip and it tapers nicely towards the front and back into the frame.
Additionally it does not have the ridge around the edges.
Stingray grip on left C-100 grip on the right.


If I'm not mistaken, the grip on the left is actually a full-size grip from CZ?  That looks like the CZ logo at least.  My stock Stingray-C grip was exactly the same as the one on the right, except with a Canik dolphin logo instead of the Tristar T.

Okay,
Tonight is going to be cut a little short as work has interfered.

But I do have a couple things.

One many of you have noticed that the CZ grips do not fit quite right, others have manage to convince them to fit, myself included on the Stingray.

I notice on the C-100 that the grips fit terribly last night so I started looking closely at where they interfered.
I could get the screws to line up but the grips at the rear of the frame gaped, so I checked the dovetail at the front to see if I had good lockup at the front.
Affirmative, we have good lockup!
Looking at the butt of the gun I could see the problem and maybe this is why others have had fitment issues.

In that photo you can see that the CZ grip has a long radius cut to the grip and the C-100 has an almost squared off frame causing interference.
If you slide the grips back to where the holes for the grip screw does not line up you can get the grip to fit flush at the back.
Seeing at I have these nice grips I did not want to modify the hole location so I came up with a different solution.

RECUT THE INSIDE OF THE GRIP TO MATCH THE FRAME ANGLE.
It took a lot of slow cutting, after all I did not want to destroy my new grips, But I gradually got the contour correct on both grips.

Nice work getting those grips to fit!  After seeing this, it sounds like all of the grips need different work to fit properly.  ;D  On the ebay wood Thailand ones I put on my Stingray, almost no work was needed, but on the VZ set for my P-120, I had to remove a decent amount, but from a different place - the top and bottom horizontal spots that would lock into the hollow in the frame. Strange!

As with your other work first safety check the gun, then remove the slide.
Next remove the grips, and remove the Hammer spring as in part 1.

Next you need to remove the safety.
The Canik/Tristars have a detent safety, meaning they have a spring and ball on the back side of the safety that may fly off if you are not careful.
They differ from CZ on this as CZ has a catch inside the gun that can be pulled back with a dental pick.
First step to remove the safety is down in the sear cage the Sear spring rests in a slot and the safety has a slot that the sear spring slides into locking the sear into the gun.


As you can see I use a dental pick to lift this spring, and once it is lifted you move it to the left or what would be down in this picture and rest it up out of the slot.
Next step is from the right side of the gun use a drift punch to slowly PRESS (NOT hammer) out the safety toward the right side.[/URL]

Just a quick note for Stingray users looking to do this, since I couldn't find anything about it on the web when I did mine - The ambidextrous safety comes out differently!  Don't just pull up on that spring and try yanking and prying the safety out, unless you like to ruin things (ask me how I know  ;D ).  If you look closely on the stingray, all the way to the right of the inside of the frame (or the 'top' of the photo above), when the safety is up, you will see a tiny roll pin going through the shaft of the safety controls.  This needs to be tapped out before you can remove the safety lever!  Once this is out, lift the spring out of the way like in terry mc's photos, and then the safety will come out in 2 pieces; one from each side.  I'll try to get a picture in the next couple of days to clarify, since people trying to install these or research them will probably find your thread.

With the sear out of the way, there is another item Canik does different than the CZ75's for the hammer pivot pin they use an internal locking pin instead of the external one on the 75's, this is just like the RAMI's only harder.
I found the pin so short it is flush inside the gun with no way to press it out or get a grip on the pin.
So cringing, I turned the gun upside down, held the hammer back (remember no sear to hold it in place) and tapped my wood work bench thru a towel with the frame of the gun. I was successful the pin came out onto the towel.

Be careful it is tiny!


After pounding my head against the wall (and my frame against my desk) and trying and trying to figure out what to do to get this thing out; what finally worked for me was sticking a small magnetized screwdriver in and touching it against the top of the pin. Lifted it right out!

Alright, hijacking over, sorry!

The C-100 is looking great, keep it up!  I really like that stainless hammer - wish I had thought of that!  Great photo's as well, very informative.  This thread is making me want a C-100...  :-X

Does the race hammer work with the stock sear?  I thought it had different catch-points.
« Last Edit: May 06, 2014, 11:39:54 PM by p4R4d0x »

Offline terry mc

  • Sr. Member
  • ****
  • Posts: 680
You may be right on the grips. I saw the grips in the drawer and thought they were the Canik.
I don't even remember having a set of the plastic grips for CZ. But they look the right size to a full size set.

And yes he is right about the safety, that is what I am going to photograph to show you all about.
There is a small 1/16" pin that locks the ambidextrous safetys together.
Terry Mc
Gloss Blue CZ-97BE-SAO

CZ Scorpion CZ Custom Trigger Pack, Streamlight TLR-1HL Primary Arms MD-ADS

CZ75 Shadow 9mm SAO

Offline terry mc

  • Sr. Member
  • ****
  • Posts: 680
So as promised here is a picture of the item that is different on the safety for an ambidextrous Canik and the Left side safety only Canik's.
In the picture below, you can see a small hole in the frame along the edge of the sear cage and the frame just inside of the right side safety.
This is the pin that locks the two halves of the safety together. On the CZ the ambidextrous safety is tied together with the sear spring, but as they have done in a lot of other cases Canik has taken to changing things.


Thank you to DexterGSP for letting me photograph this detail.

Now I have not done this but, when I owned the Stingray Schmeky informed me that you knock this pin out, (safety will need to be up, so the pin is aligned)
and there is a spot in the frame that will hold it until you have removed the sear cage and retrieve it. Now that the two halves are divided, you should be able to just pull the right side off and the left side should follow the directions as I described in part 2.
The hard part will be to put the pin back as it is a small space and a small pin.
P4R4d0x can probably elaborate on this process and the difficulties as he has done it.
Schmeky if I have misquoted please feel free to correct me, it has been a couple months since we talked about this.
Terry Mc
Gloss Blue CZ-97BE-SAO

CZ Scorpion CZ Custom Trigger Pack, Streamlight TLR-1HL Primary Arms MD-ADS

CZ75 Shadow 9mm SAO

Offline terry mc

  • Sr. Member
  • ****
  • Posts: 680
PART 3 SEAR

Tonight we are going to install the new sear and set the safety.

We have a lot to talk about and I am sure there will be some discussion with what I have found.

A couple of us have noticed that Caniks have some variation in builds, whether it is the feel of the trigger, the width of the frame, or in tonights case the dimensions of the sear cage.
I started the simple but, meticulous task of installing the new sear, Firing ping lifter assembly, and associated springs only to find that I had an interference fit.
Meaning parts were rubbing against each other and HARD, enough that the sear or the lifter would not move.

So I Emailed Schmeky and sent pictures of the issues.
He confirmed that Canik makes rolling changes, and that as he put it "Hard to hit a moving target" and that he will be making adjustments to the next batch.
His advice to make it work is just as I thought trim the side of the sear or sear body where they are making contact, and that this will not cause any issues.
It reminds me of a certain Italian motorcycle manufacturer, that has always made rolling changes in the middle of the year, and if they find some old parts they throw those in also.

So I am going to say it now, tonights mods are not for the faint of heart.
It can be scary resizing small parts, but not as hard as you think.

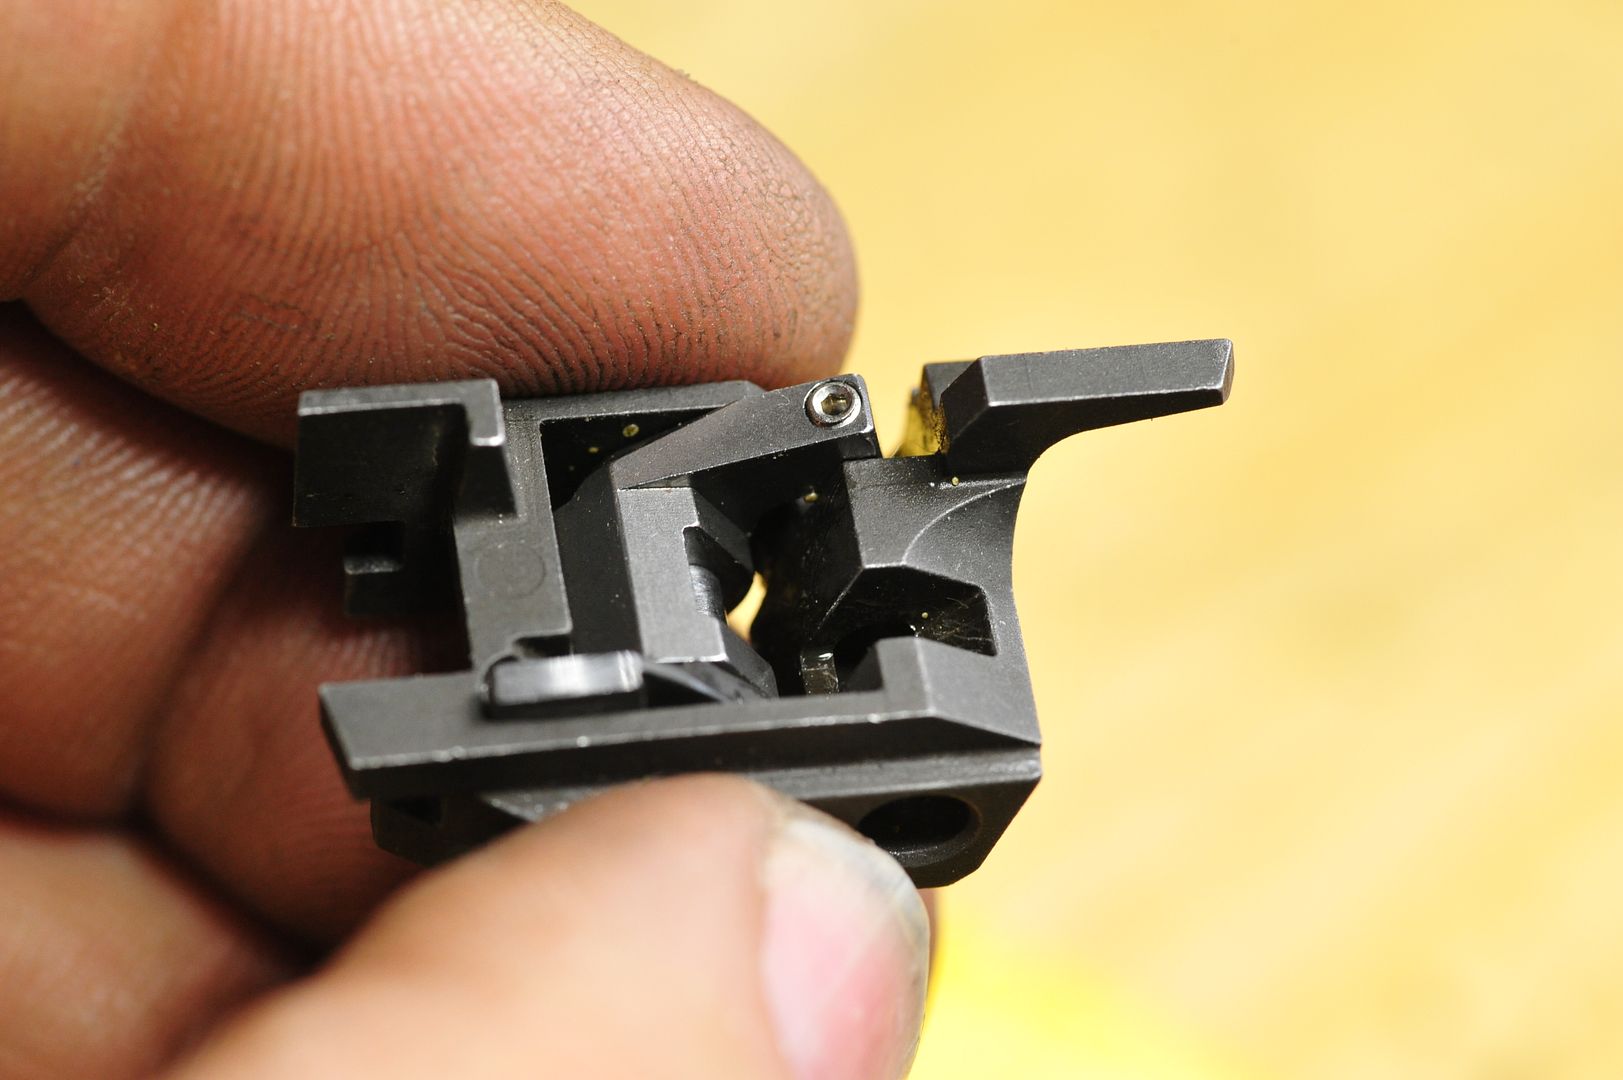
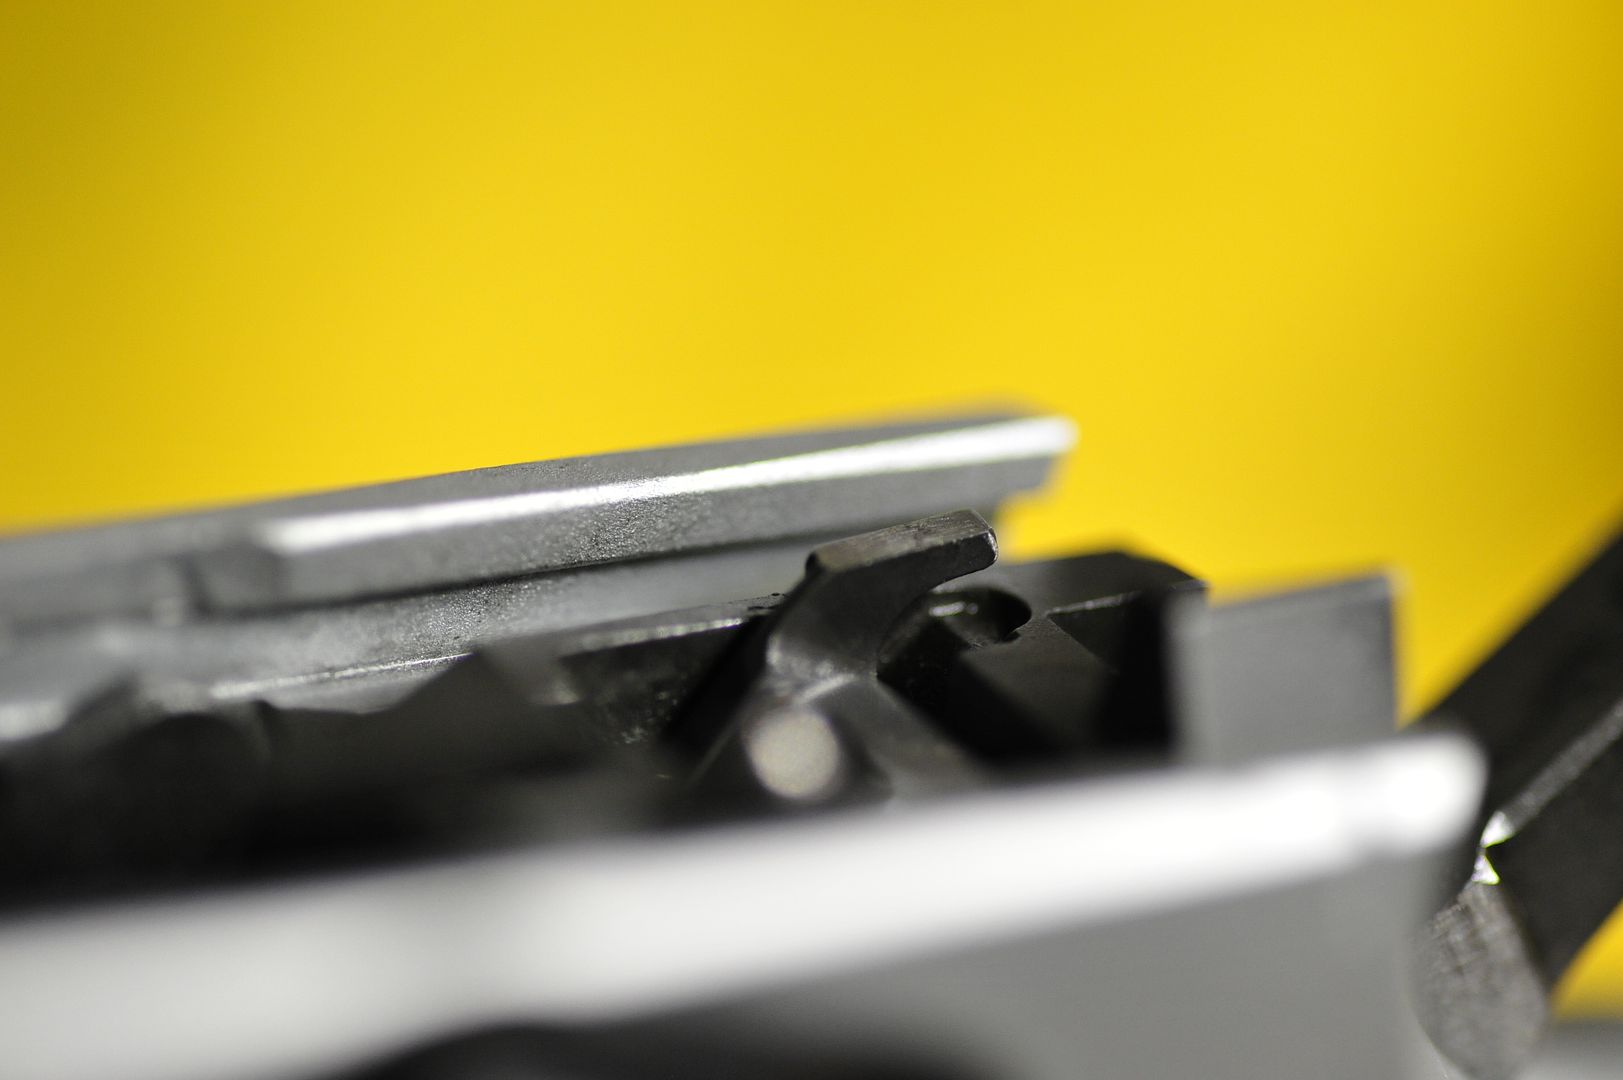
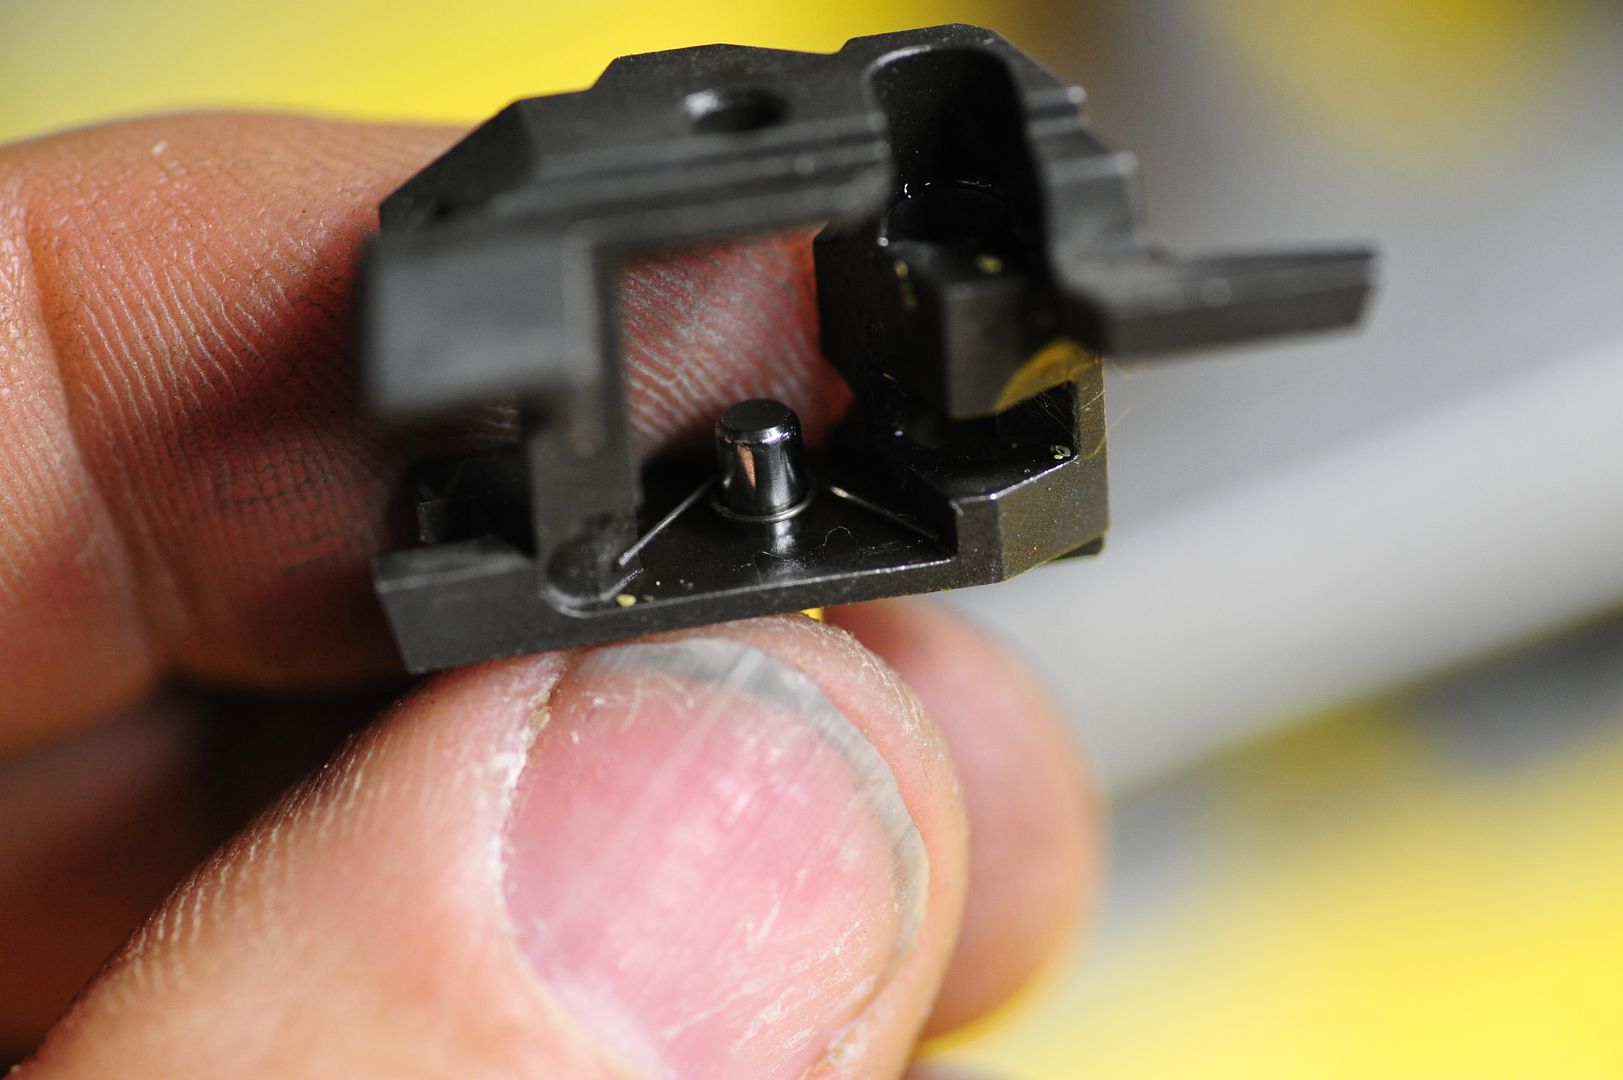
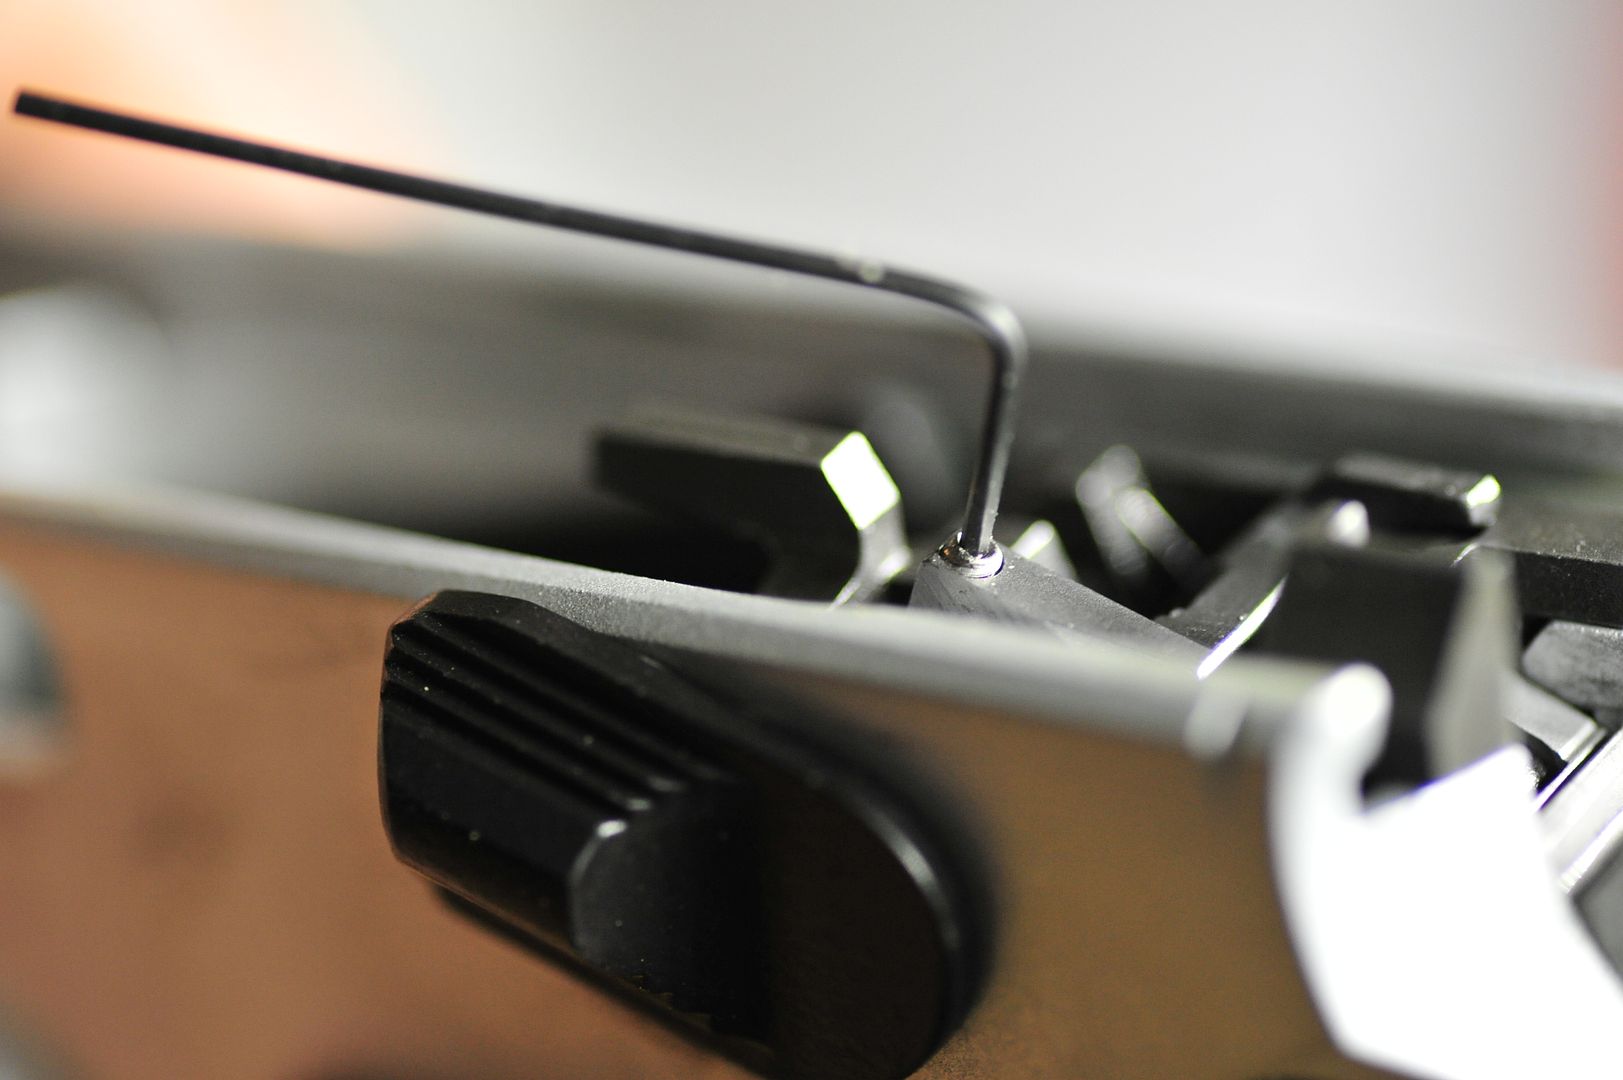
In the following picture you can see the safety arm hitting the inside edge of the sear cage pulling the sear to the left.


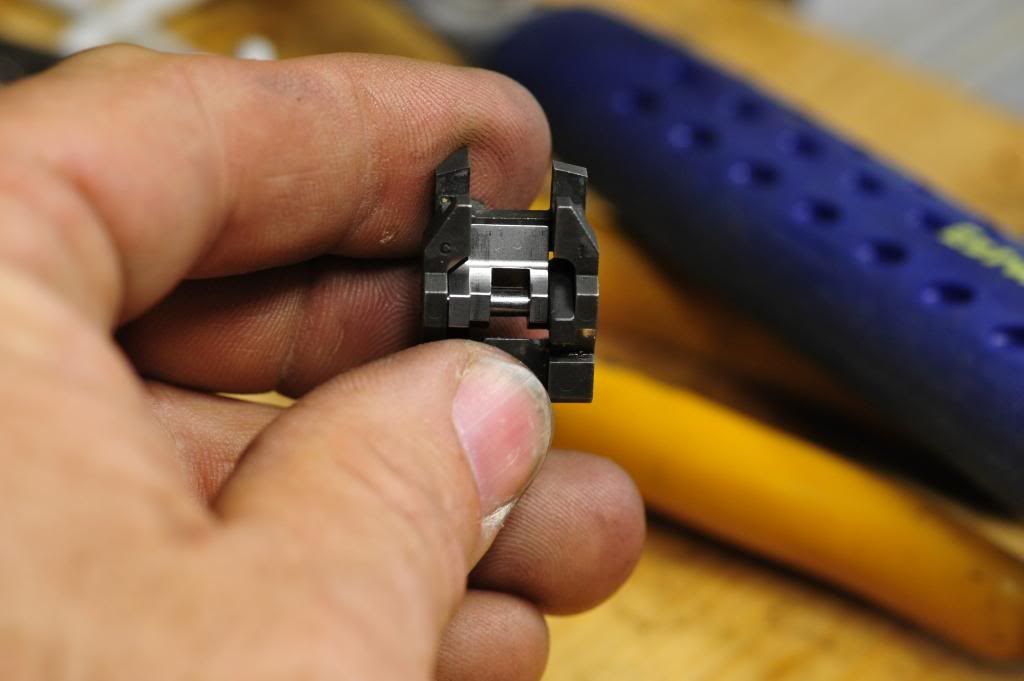
In this view of the bottom you can see the sear pulled to the left and binding against the left wall.

I am getting ahead of myself, in part 2 we talked about removing the sear and kind of stopped there.
Disassembling the sear cage is pretty simple but you need to use caution if you are reusing the parts.
You need to place a finger on the top and bottom of the sear cage and push the pin out sideways.
The fingers will keep the loose parts from flying out.


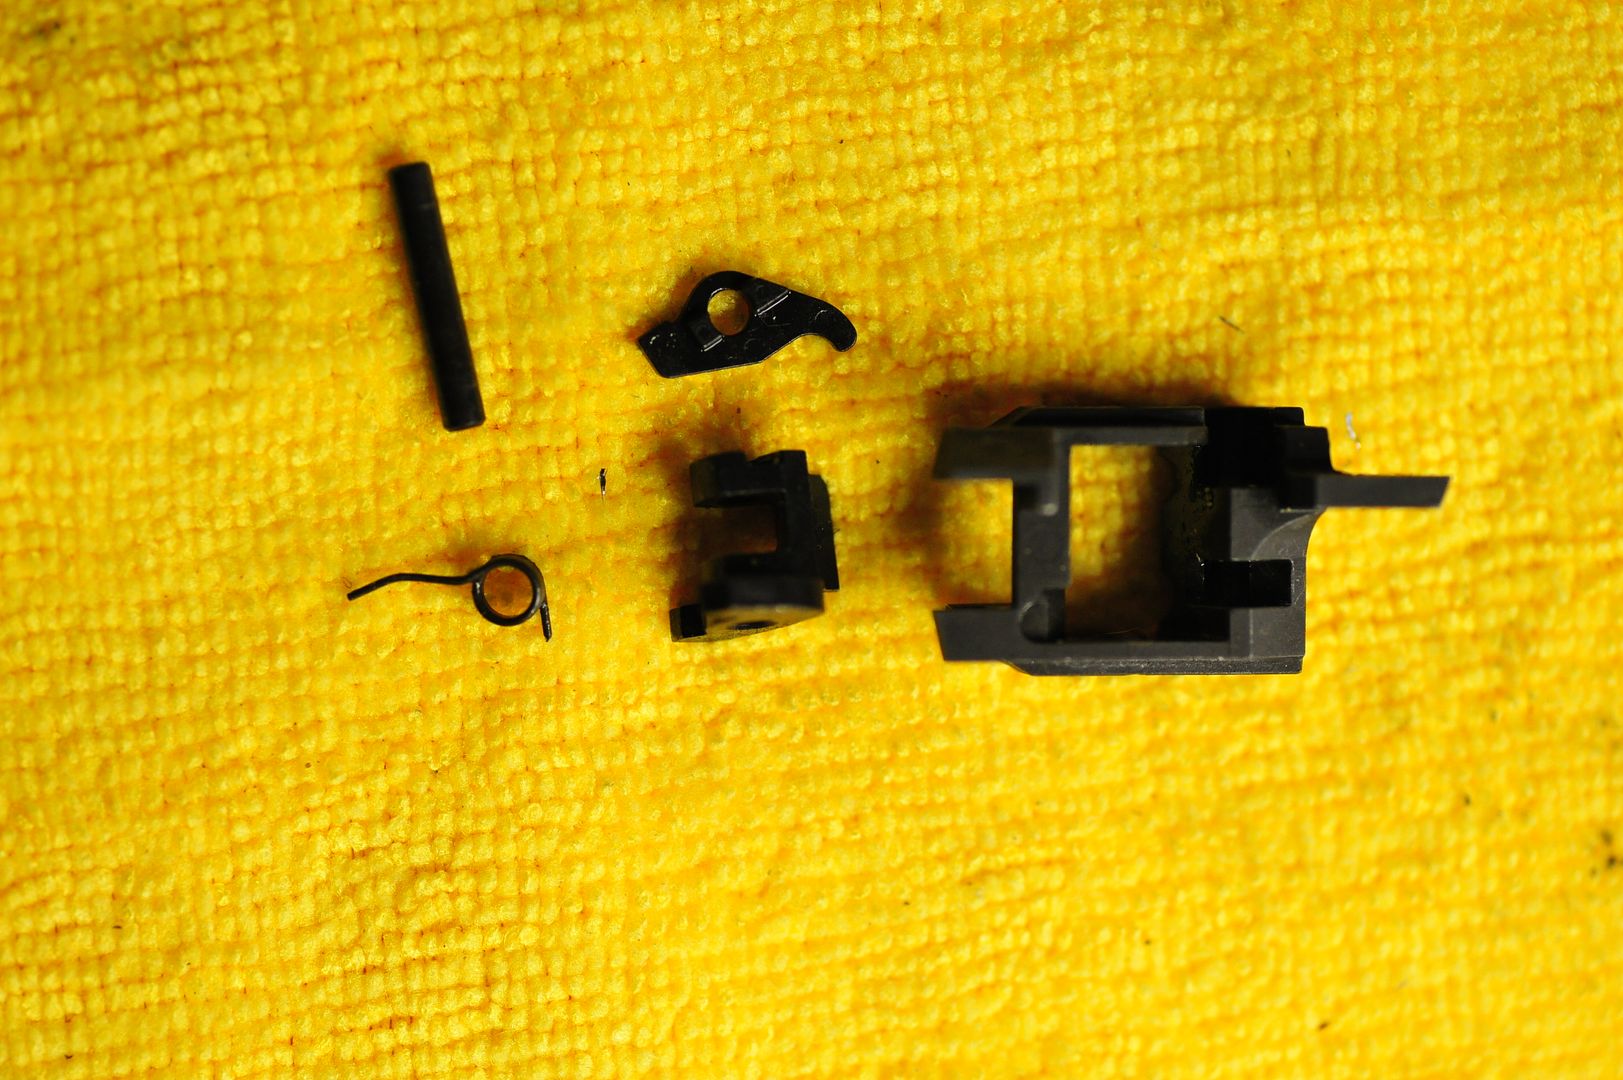
Here are the loose parts.


Someone asked me at one point can the stock sear be used with the new hammer.
The answer is on a CZ yes, on a Canik/Tristar NO ABSOLUTELY NOT.
David, aka Schmeky made an important improvement on his hammer sear kit.

He separated out the Firing pin Block lifter from the sear function, it is floating even though they are both moved by the same trigger bar.
Whys is this important??
The race hammer has a smaller shelf on the hammer for the sear.
It takes a smaller movement of the trigger than the stock hammer.
With the new sear kit the firing pin block moves sooner than the sear so that once the sear is disengages the firing pin block is already out of the way.
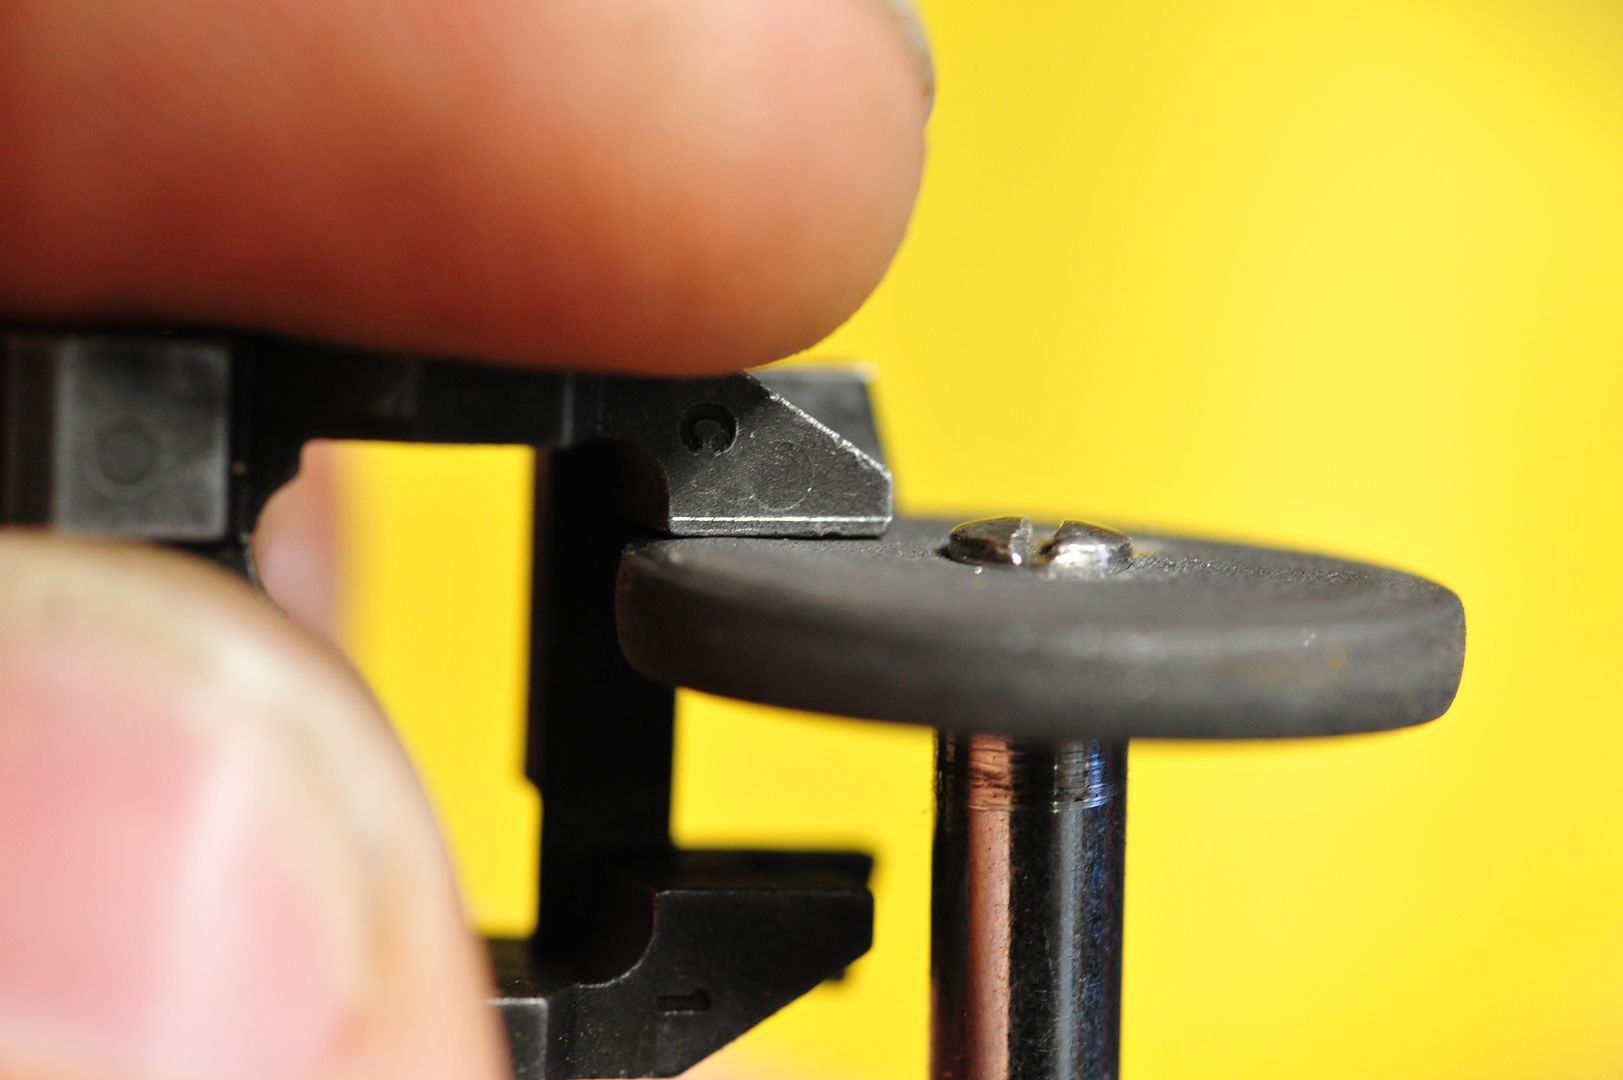
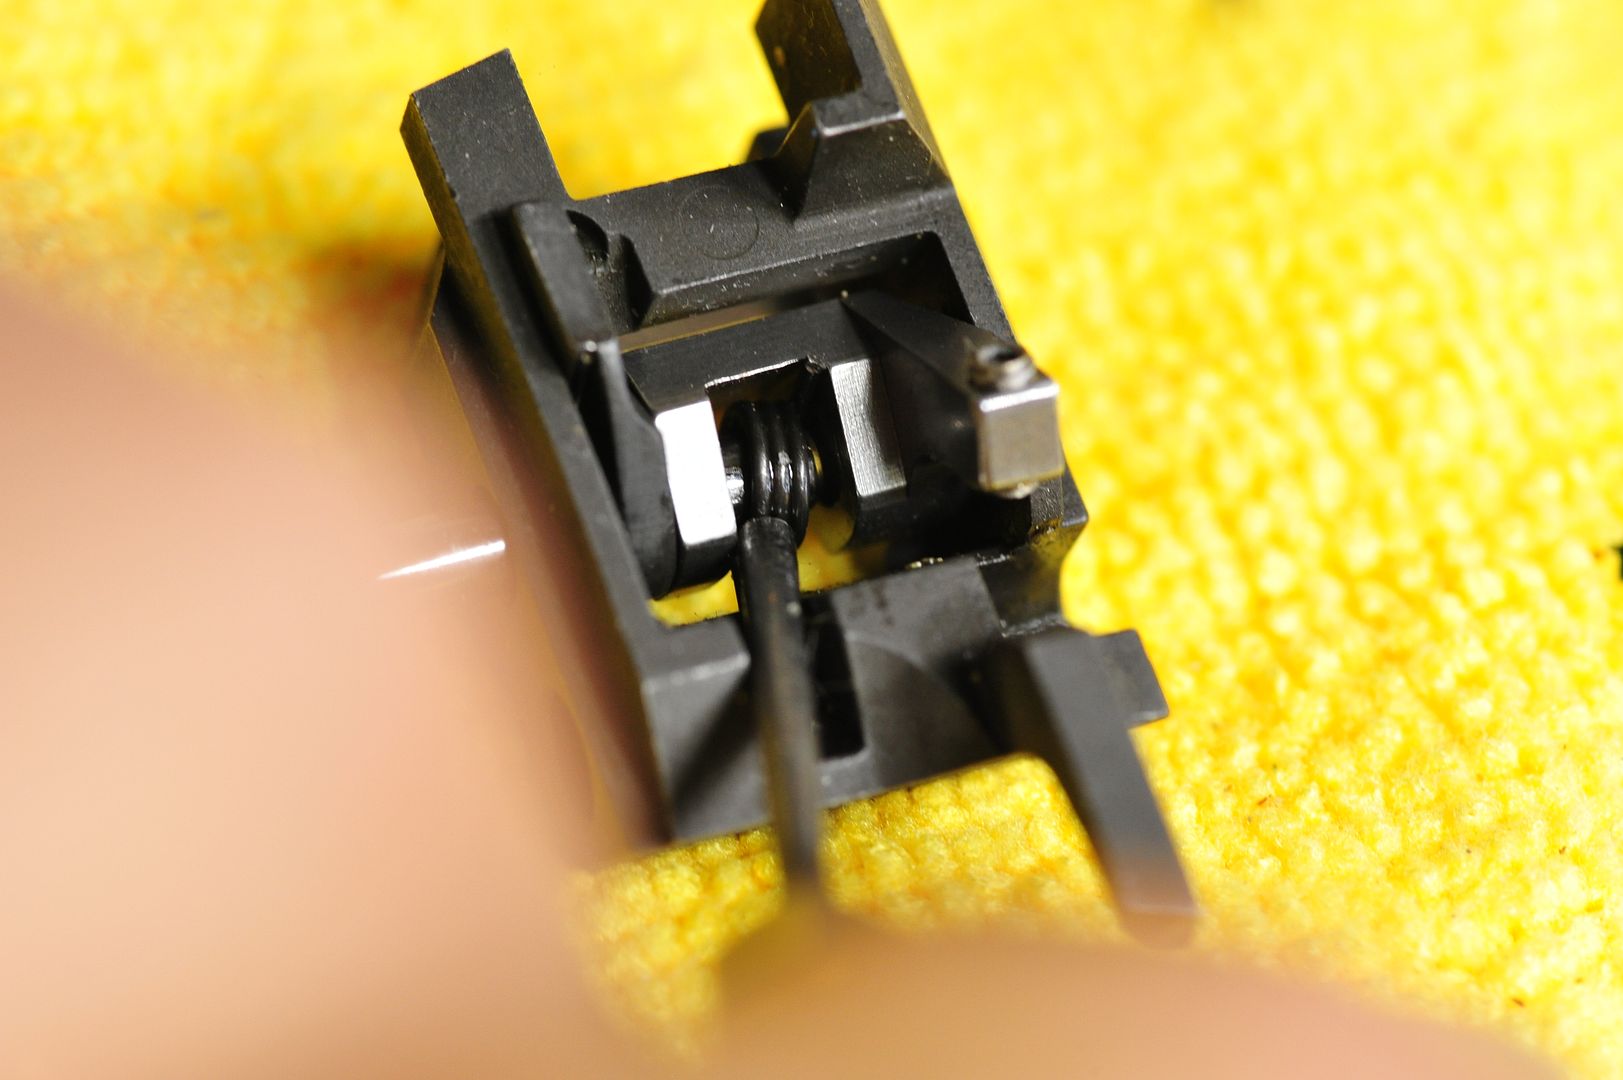
In this picture you can see the FPB lifter moving up and the hammer in the background is still stationary.


The Stock sear and FPB lifter are dovetailed to each other so they move at the same time and the FPB does not get the headstart it needs with the new hammer.
With the stock sear the hammer would drop before the block would move up and the gun no go BANG!
Bad thing if you are defending yourself.
So major props to CGW for doing all the development work to these guns work with a race hammer.

Now to the fitting.
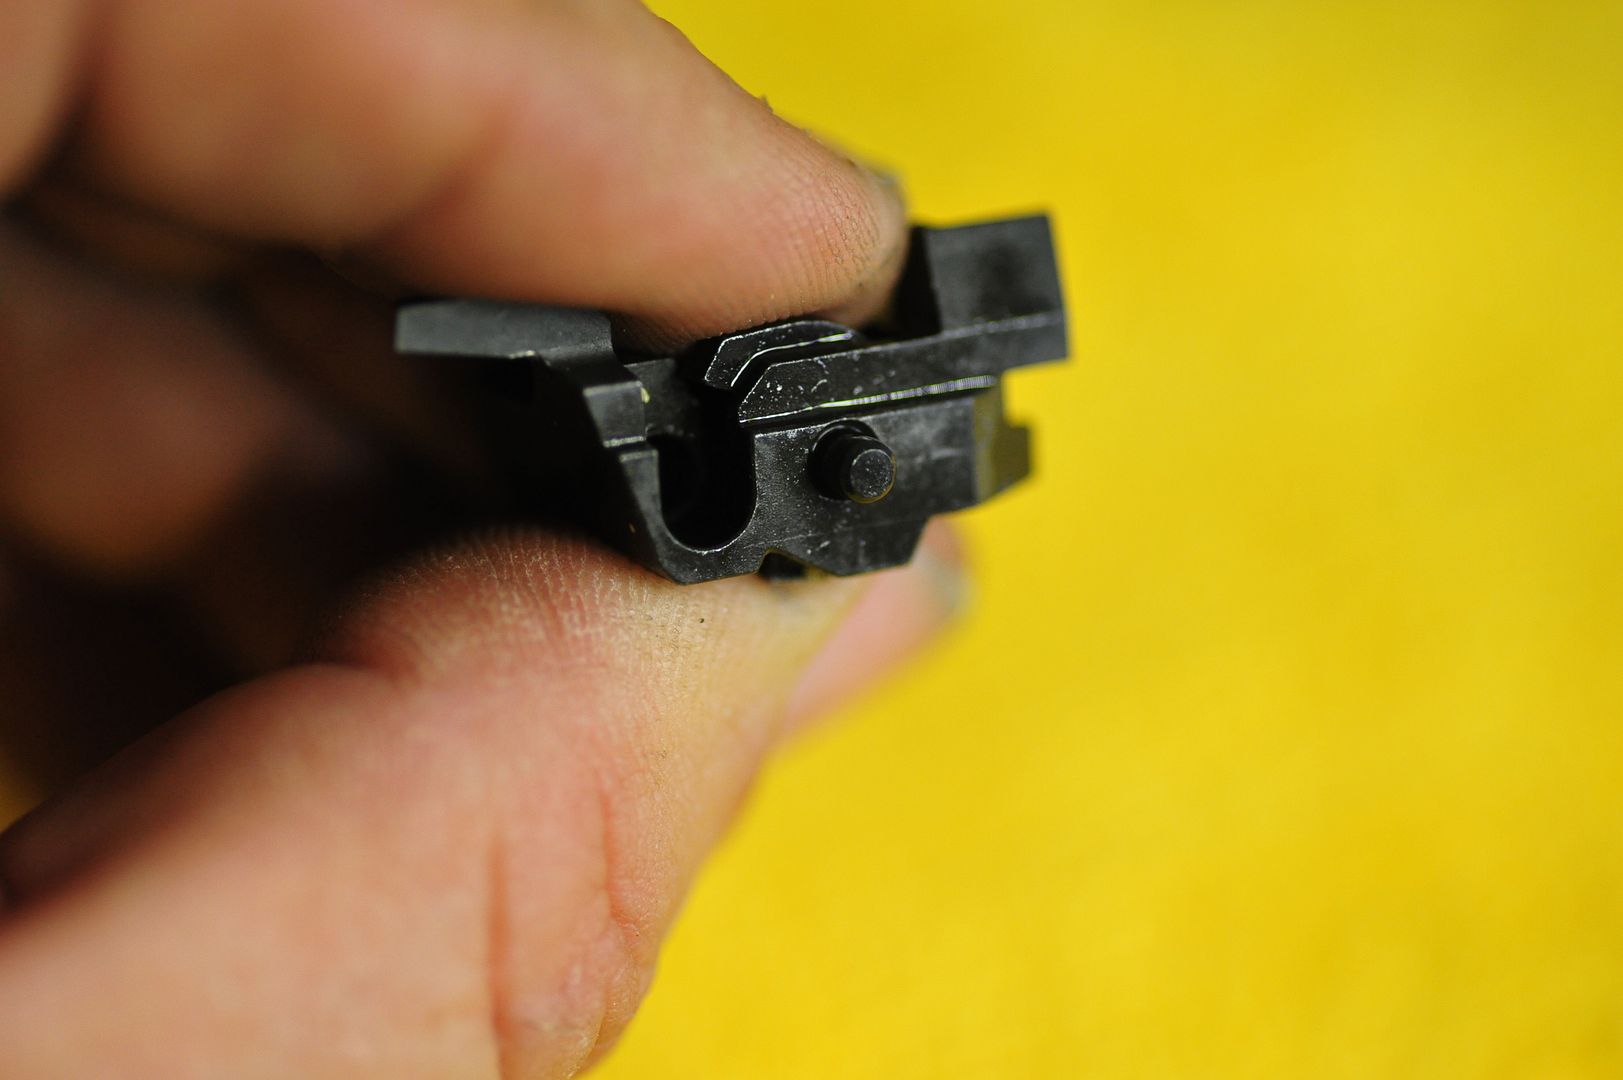
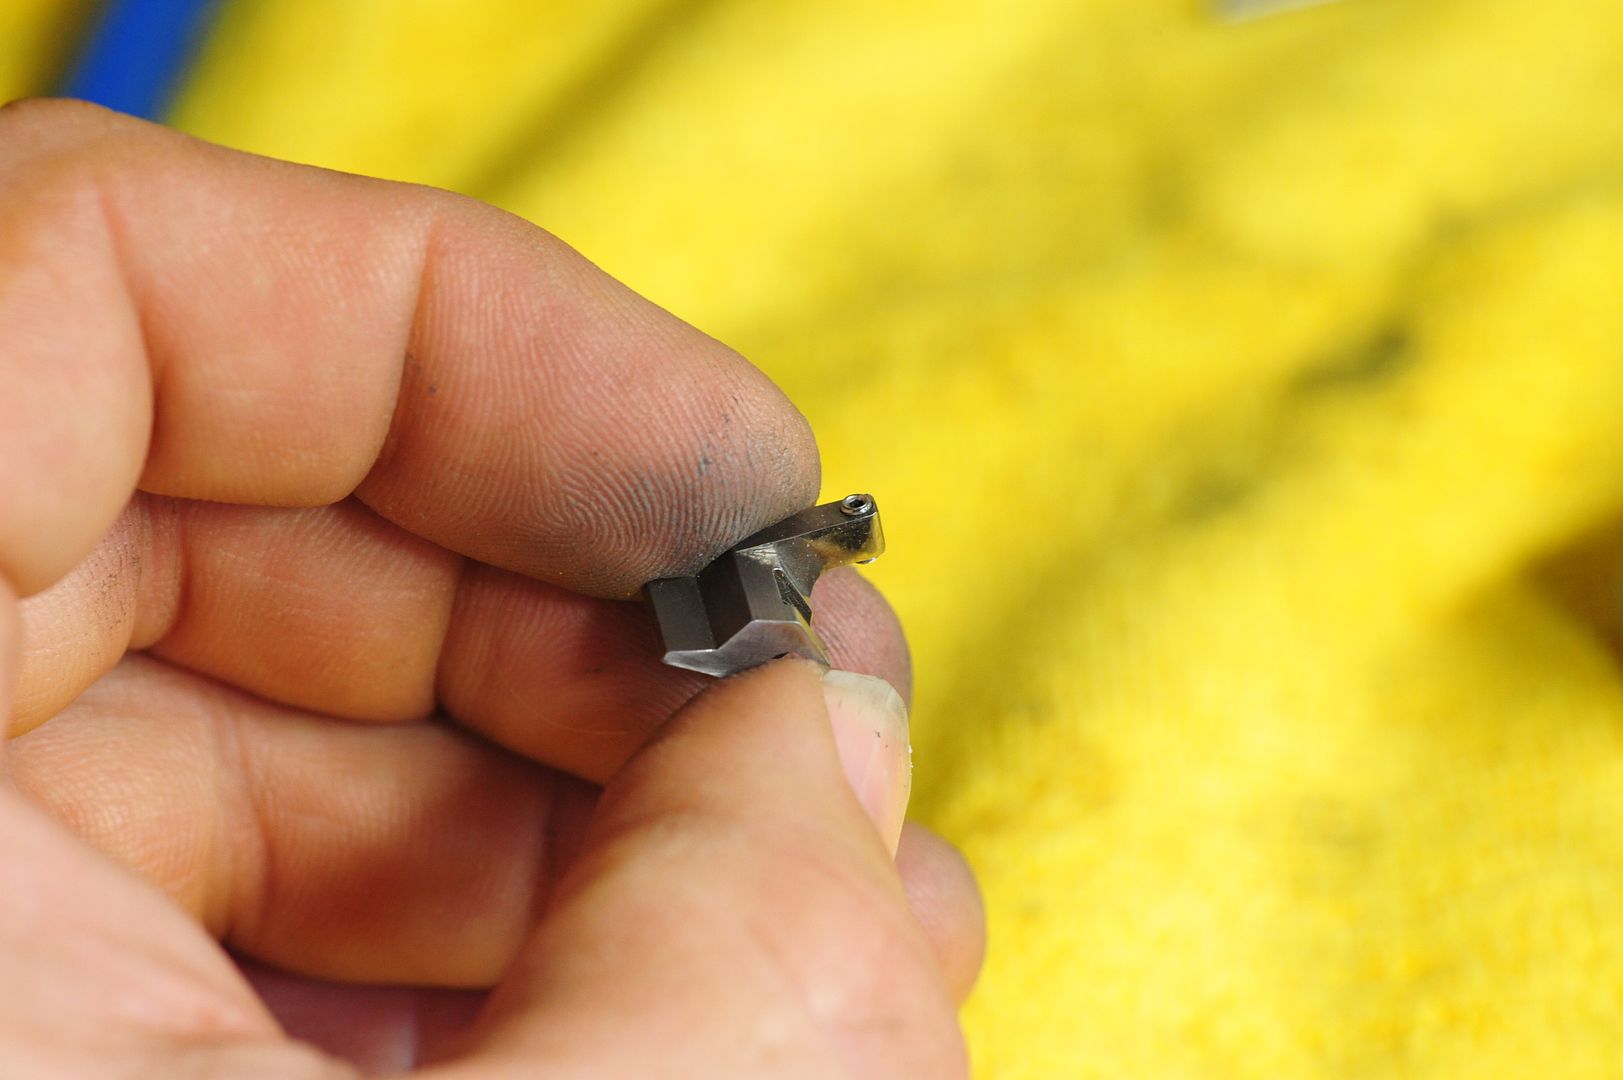
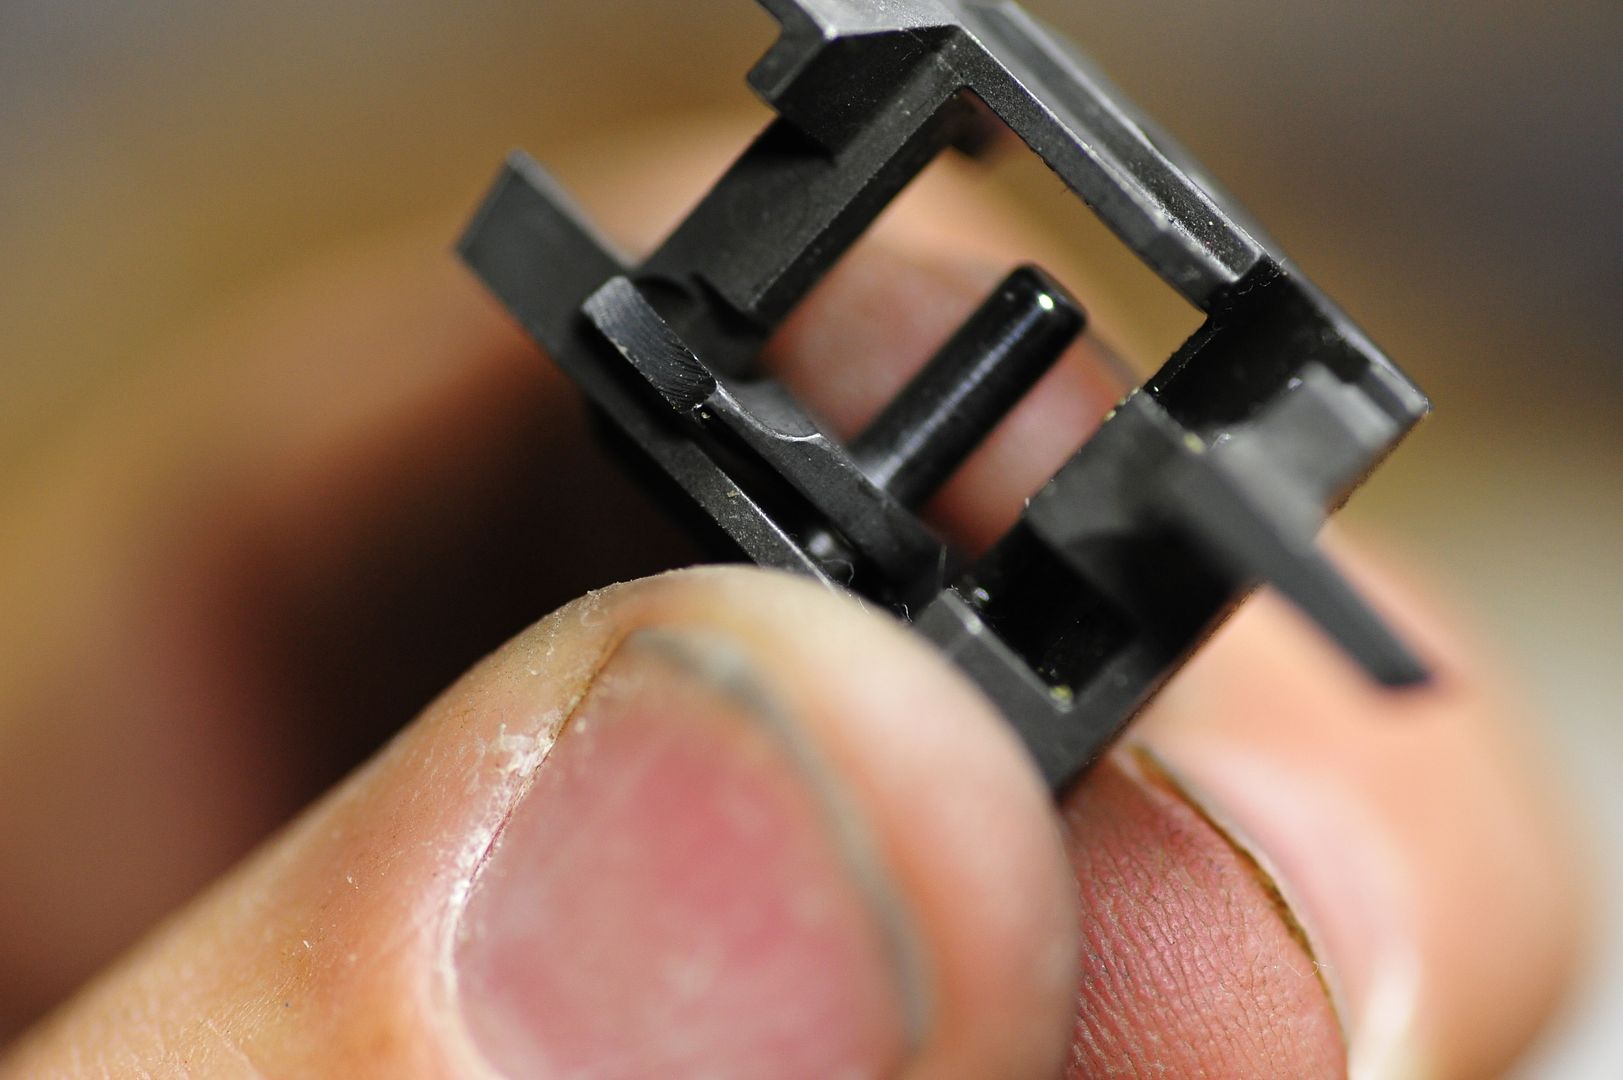
I wound up removing material in 2 places on the left side wall inside what I call the sear window, and to the right side of the safety arm on the new sear.
First I scribed a line of .5mm on the sear cage and used a dremel with a flat grinding bit against the surface I wanted to modify.
The scribe line allowed me to make sure the cut remained square and give me a reference for how much material I removed even though I did not go all the way to the scribe line.


I ground a little and then tried a fit and gournd some more and tried again until I felt I had it. It takes longer but it is better than cutting too much, superglue will not put it back.

Once I had that I still felt that the safety arm was rubbing too much as in it touched period.
So I removed some material off the inside of the arm.


So now I have all the parts the way I want with one exception. I like to polish the sear pin.
I know I said I would do all the polishing later, but I would rather not tar down the sear cage again when I do the other parts so I am going to cheat tonight on this part.
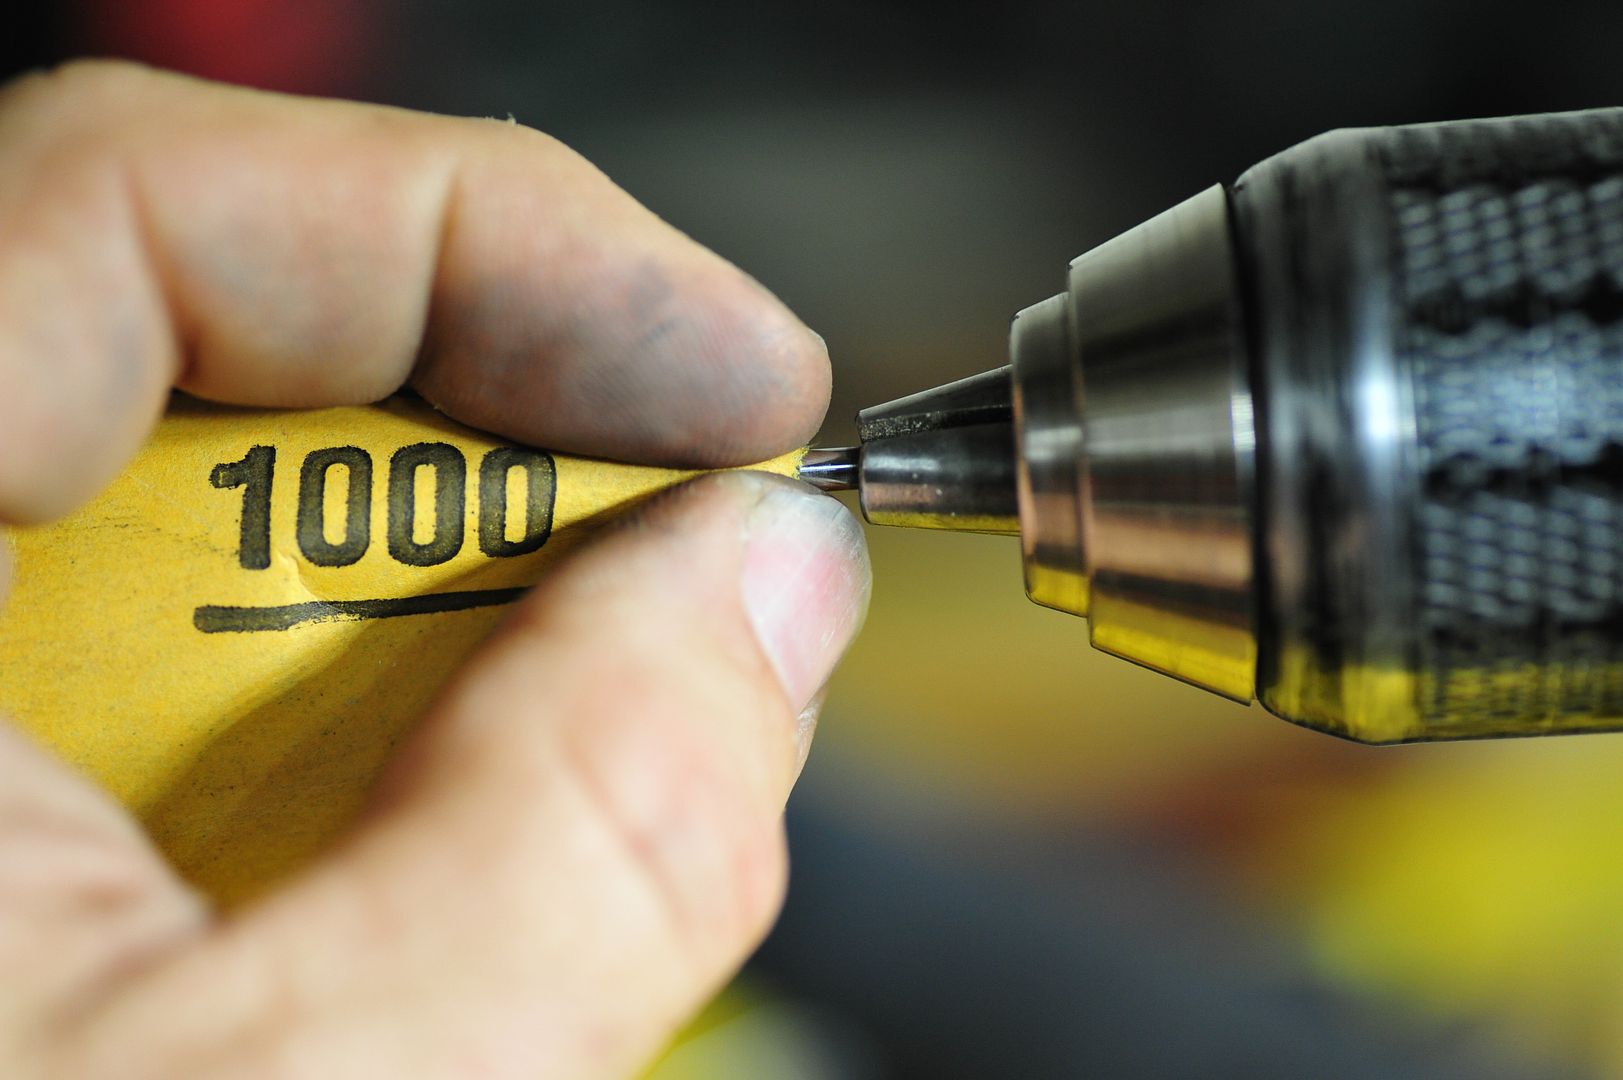
I chuck it up in a drill sand the pin with 800, 1000, and 2000 grit sandpaper to get a mirror finish. Then I turn it around and do the other side.


Reassembling the sear,
I tend to start from the FPB lifter side, I put the pin in a small amount and slip the FPB lifter spring on it. that is the first thing on that side, make sure the V shape is facing up.

Next I install the FPB lifter and set the spring in the grove on it.


Then I install the sear pushing the pin in just far enough to hold it in place but not interfere with the sear spring.
I put the sear spring in the middle of the sear, again make sure the V is facing up and that  the top leg is resting on the back of the sear.
I will use a Drift punch to press the spring back while I push the pin through the hole. Like this.


Now you finish pushing the pin the rest of the way through the sear cage and you have completed all the hard work.
Some guys do it the other way and I have tried it both ways, I like this way as I loose fewer of the FPB lifter springs, OH YEAH order extras of those, they fly away regularly.

Once the sear is assembled make sure you have no binding and the safety arm should be lifted UP by the spring.
The FPB lifter should be pulled down by the spring. Check them I hook a finger nail under the FPB lifter and pull it up and see if it snaps back it should move freely. Same thing with the sear, press down on the safety arm and see if it pushed back easily on its own. If not on either one you may need to trim some more.

reinstall the sear into the body of the gun, They slot in real nice on tight on the Caniks this is something that I think that they are tighter than a CZ on.
lift your sear spring up like when you removed your safety rest it up high. reinstall your safety.
Tip here, before you loose your ballbearing put a little dab of grease behind the ballbearing it will help hold it in while you are installing the safety.
Slide the sear spring back onto the safety locking it in place.
REinstall the hammer spring and retainer.

Here is something that I like about all CGW sears over CZC I really like the adjustable sear, it saves a lot of time.
to set the safety, cock the hammer fully, engage safety (if safety will not engage then loosen the allen screw until it will)
once safety is on with the hammer back tighten the adjustment screw until it is against the safety.
Try disengaging safety, if it disengages, then pull the trigger if the hammer drops good.
Pull the hammer back, try reengaging the safety if it engages pull the trigger you should not be able to drop the hammer.
Do this back and forth a few times and feel the engagement of the safety will it click on and off with your thumb?
Does it lock the hammer back, does the hammer fall everytime when the safety is off and the trigger is pulled.
If so you have found the engagement point. Back it out and apply the locktite that Schmeky recommends and go back to your set point, you should have a good feel for what it feels like after fine tuning it in advance.


Well this segment was a lot of work with the trimming needed.
Once I finished reinstalling the slide there was one more function check to do.
Just as CGW tells you, you will need to check to make sure the firing pin block lifter is working correctly.
This is easy, put he gun in your right hand, cock the hammer, now pull the trigger while holding the hammer.
While the trigger is pulled, take a drift punch and push forward on the firing pin. It should push forward until slightly recessed in its hole.
If it does, then release the trigger and try again, now it should not move forward into the hole.
This is all in the instructions and it is very important! Again if it does not work the gun no go BANG!

Well was it all worth it.
Absolutely, I like a smooth trigger and this one keeps improving with each stage.
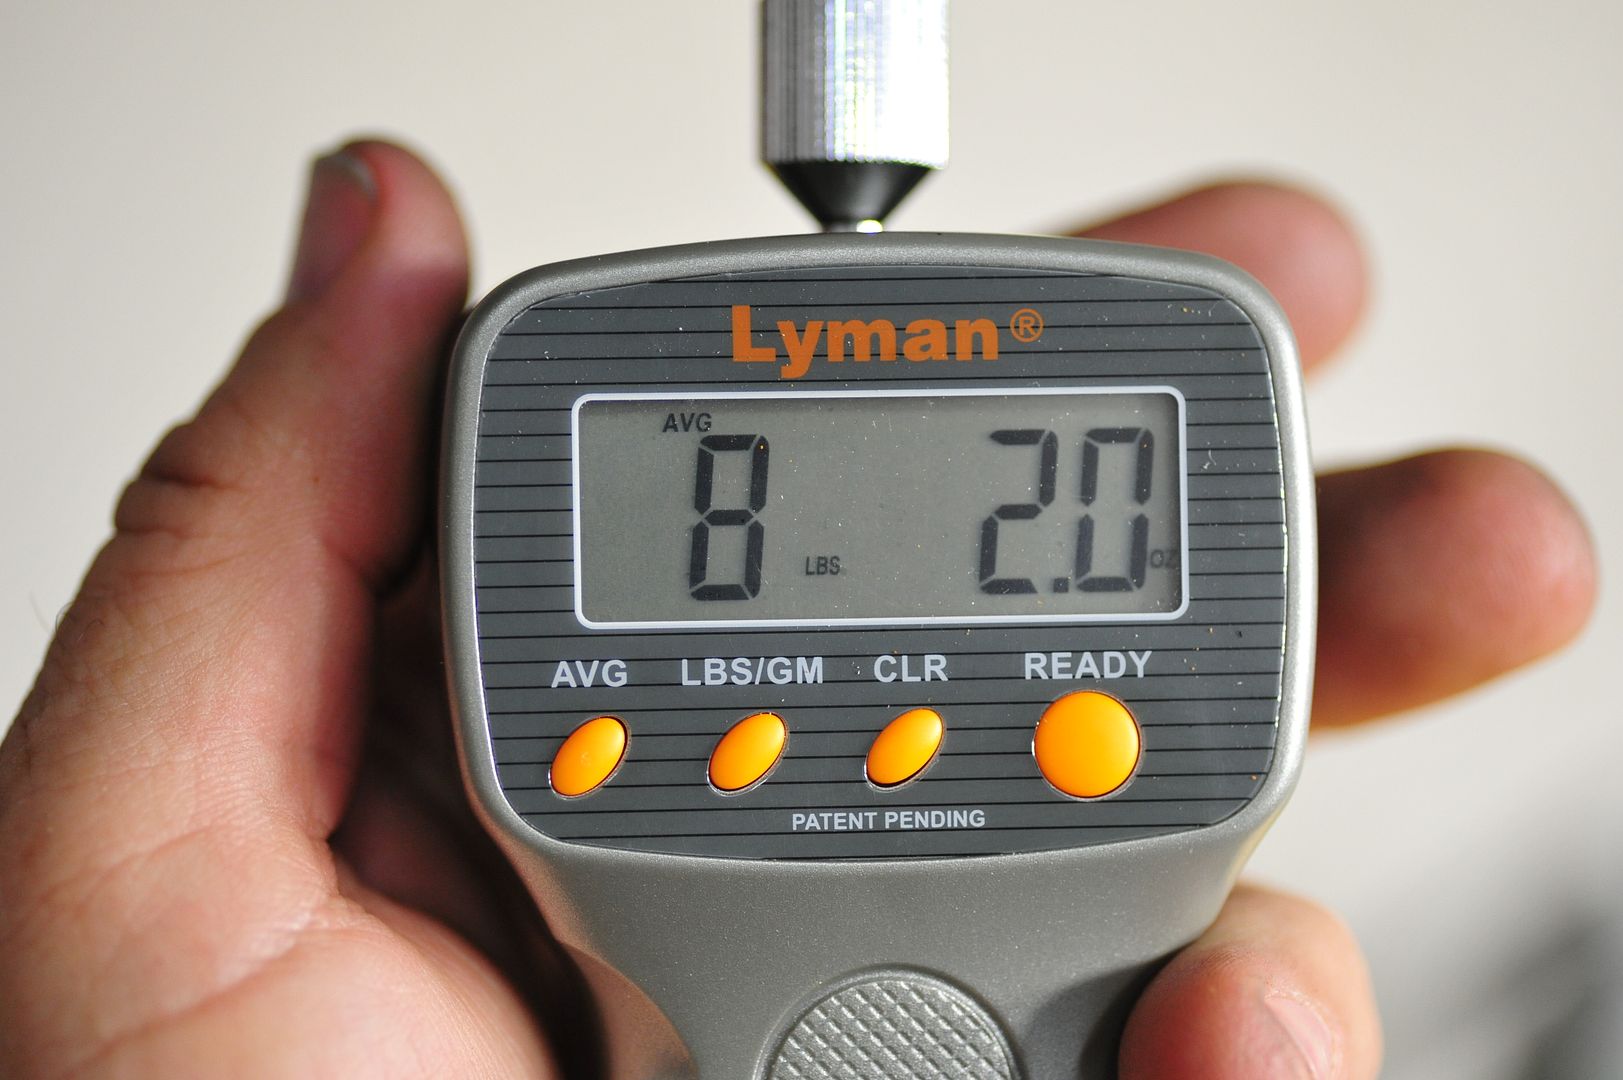
Now for some measurements.

DOUBLE ACTION 8LBS. 2 0Z. that is an improvement of 4 oz. on the DA. over just the springs.  Not that much but this modification is more about the SA pull both in weight and in feel.


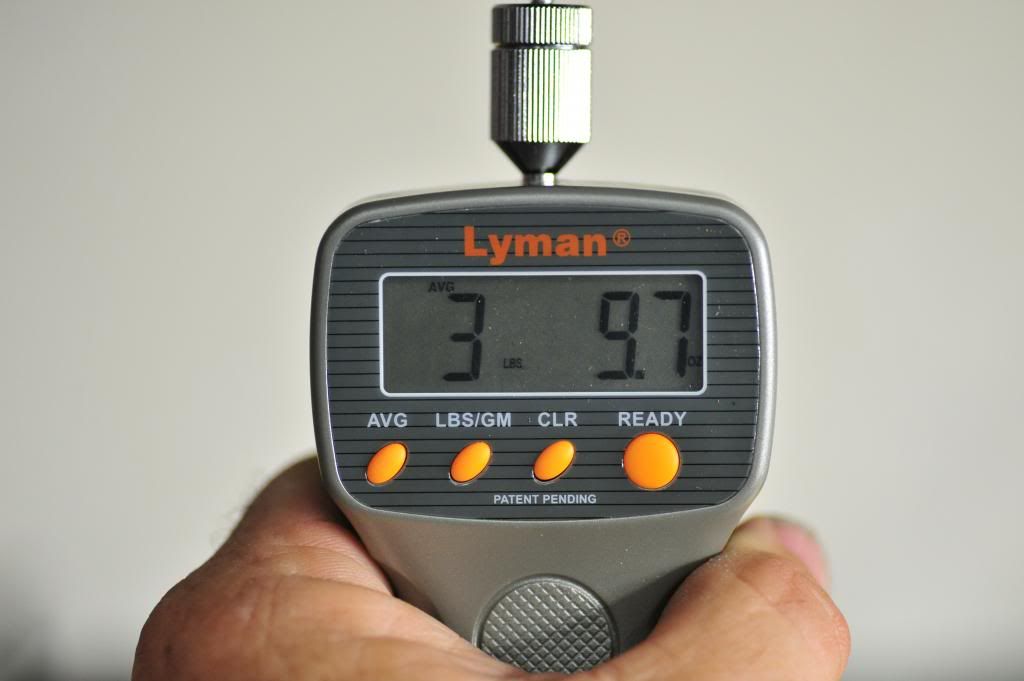
SINGLE ACTION 3 lbs. 9.7 oz. That is 14.1 oz. lighter than the springs alone! big jump and now we are a combined 1 lb. 6.3 oz lighter than stock!
Here is the kicker, this is as much about the short trigger pull from the SA from engagement of the sear to the drop of the hammer. That movement is less than half the distance it was previously. I am sorry I did not measure before but believe me that this trigger is nice and short and crisp!

« Last Edit: May 08, 2014, 10:39:50 AM by terry mc »
Terry Mc
Gloss Blue CZ-97BE-SAO

CZ Scorpion CZ Custom Trigger Pack, Streamlight TLR-1HL Primary Arms MD-ADS

CZ75 Shadow 9mm SAO

Offline terry mc

  • Sr. Member
  • ****
  • Posts: 680
Just for Reference FarmerBob, a new forum member has recorded the trigger weight of an S120 for DOUBLE ACTION at 18 lbs.,
His single action was 5 lbs which is where this gun started at.

If we started with an 18lb trigger pull in double action  that means to date we have removed almost 10 lbs. of trigger pull!
Terry Mc
Gloss Blue CZ-97BE-SAO

CZ Scorpion CZ Custom Trigger Pack, Streamlight TLR-1HL Primary Arms MD-ADS

CZ75 Shadow 9mm SAO

Offline DexterGSP

  • Full Member
  • ***
  • Posts: 334
As usual, great pictures and tutorial!

I look forward to firing your pistol the next time we go out.  Maybe there's a hammer/sear kit in the near future for me.

Paul

AZCDL and GOA Member

Offline jwc007

  • Global Moderator
  • Hero Member
  • *****
  • Posts: 8649
Making this a sticky   :)
"Easy is the path to wisdom for those not blinded by ego." - Yoda


For all of those killed by a 9mm: "Get up! You are not dead! You were shot with a useless cartridge!"

Offline p4R4d0x

  • Full Member
  • ***
  • Posts: 185
    • Staufhammer Photography
So as promised here is a picture of the item that is different on the safety for an ambidextrous Canik and the Left side safety only Canik's.
In the picture below, you can see a small hole in the frame along the edge of the sear cage and the frame just inside of the right side safety.
This is the pin that locks the two halves of the safety together. On the CZ the ambidextrous safety is tied together with the sear spring, but as they have done in a lot of other cases Canik has taken to changing things.


Thank you to DexterGSP for letting me photograph this detail.

Now I have not done this but, when I owned the Stingray Schmeky informed me that you knock this pin out, (safety will need to be up, so the pin is aligned)
and there is a spot in the frame that will hold it until you have removed the sear cage and retrieve it. Now that the two halves are divided, you should be able to just pull the right side off and the left side should follow the directions as I described in part 2.
The hard part will be to put the pin back as it is a small space and a small pin.
P4R4d0x can probably elaborate on this process and the difficulties as he has done it.
Schmeky if I have misquoted please feel free to correct me, it has been a couple months since we talked about this.

Sounds right to me!  Safety up - > lightly punch out the pin -> right side should be loose and able to be gently pulled out -> proceed with lifting spring up to remove left hand side.  To get the pin back in, the easiest way I found was to use a pair of thin needle-nose pliers with a 45* angle tip to get it aligned and gently pressed into place, and then use the roll pin punch to get it the rest of the way through.  It goes in very easy so don't pound too hard - if it gives you resistance, make sure the left and right safety pieces are lined up.

When you tap the pin out, mine always got stuck on the top of the trigger bar.  Once I swore I heard it hit the floor and spent 20 minutes frantically searching for it just to discover it was still in the frame of the gun.  ;D

As usual, great posts! Glad to see it made it to 'stickyness'.


Regarding the sear fitment; I had the same issue in both the Stingray-C and P-120 - with the parts in the pin either wouldn't fit all the way through because of contact between the sear and sear cage pushing it off-centered, or it would fit through but the sear couldn't rotate.  I ended up filing down just a small amount of material from the left-most side of the sear itself, since that seemed to be where most of the contact was, and that solved the problem.  I was pretty worried/stressed about doing this, but it really was no big deal - as long as you go slow, taking small amounts of material off at a time (I commend you for using a Dremel, I think I would have wet myself! I used a small hand file), and test fit often to see how close you're getting, it's no problem at all.

That lifter spring sure was a pain though!  ;D  I thought I lost mine quite a few times, as they went flying across the room.

Offline terry mc

  • Sr. Member
  • ****
  • Posts: 680


That lifter spring sure was a pain though!  ;D  I thought I lost mine quite a few times, as they went flying across the room.
Yeah that is why I keep several in stock now.
I use to average loosing one somewhere in my garage every time I do a build.
Since I changed to putting the spring side on first it has come down to almost none existent on loses but I still like to have spares.

Terry Mc
Gloss Blue CZ-97BE-SAO

CZ Scorpion CZ Custom Trigger Pack, Streamlight TLR-1HL Primary Arms MD-ADS

CZ75 Shadow 9mm SAO

Offline Bishop112

  • Sr. Member
  • ****
  • Posts: 597
Great write up and Pics Terry!

Offline TDoug

  • Newbie
  • *
  • Posts: 24
CZC site says the Tactical Tritium rear sight requires the 6.5mm front sight. Did you choose the 6.0 front sight because the gun was shooting low out of the box?

Offline terry mc

  • Sr. Member
  • ****
  • Posts: 680
TDoug,
No actually Rob checked on one of their CZC Tristar S120 and picked the sights for me.
So yes I have the 6.0, but it was based on what they have done on the 120.
Now it may not work as the sight radius  is shorter, but we shall see once I have the sights installed.
Could wind up being an expensive experiment.
Terry Mc
Gloss Blue CZ-97BE-SAO

CZ Scorpion CZ Custom Trigger Pack, Streamlight TLR-1HL Primary Arms MD-ADS

CZ75 Shadow 9mm SAO

Offline DexterGSP

  • Full Member
  • ***
  • Posts: 334
A shorter sight radius will decrease the sight elevation needed to correct the POI.  The 120 series has about a .8" longer or ruffly 14% longer sight radius than a C-100.  I think adopting the 120 series sight choice is a good place to start as it will get you closer to the mark.  However, if using the same set of sights between the S-120 and the C-100 and the object is to have the POI go up, the C-100 POI will be higher.


AZCDL and GOA Member


anything