Author Topic: Project "C-100" how to smooth a Tristar/Canik Long thread lots of pictures!  (Read 158363 times)

0 Members and 1 Guest are viewing this topic.

Offline terry mc

  • Sr. Member
  • ****
  • Posts: 680
PART 6 SMALL TOUCHES

The project is essentially complete now, but I have a couple of things that I have tried to get that ultimate product.

There was one thing that bothered me a little after the last update.
That was the slight stacking feel in single action, it was not only noticeable but I could also measure it with the trigger guage, you could see the numbers rise as the firing pin block assembly engaged.
So last night I decided to look at a couple of small things that I thought could impact it.

As I discussed before, with the CGW hammer kit, the FPB lifter is separated from the sear, and the trigger bar starts to move it prior to moving the sear.
The lifter arm rests against the side of the sear, and while the sear has a factory finish that is essentially polished the lifter arm is not.

I wanted to remove ALL friction from the lifter and FPB block so I polished the surface of the sear and the lifter assembly where they come together.

Here is a picture of where the 2 faces come together.


The next trick is one that Schmeky has mentioned in his thread in that you polish the Firing Pin Block.
On my other guns I also had polished the bore for the Block but with the hard chrome finish on the slide and the machine work it looks like I would not improve on it, so I left it alone.

Here is a shot of the part that you polish, I polished all of the circumference of the part so that all the friction surfaces have been addressed.
This was done with 2000 grit sand paper and it was only a couple minutes to get this finish.


So how did we do???
Fantastic! On take up of the pretravel I CANNOT feel the FPB move at all.
I have tried multiple times and with my eyes closed I cannot feel FPB move.

And here is the measurement of the Pretravel trigger weight 1lb. 1.3 oz. WOW compared to 2 lbs. 1.4 oz. we will call it an even pound!


That modification should not impact the SA trigger pull or the DA trigger pull as they move together once the sear is in motion.

The other modification today is the Hammer spring. David aka. Schmeky sent me the 11 lb hammer spring part number HS12000 for the benefit of the readers on here, so that we could see what the impact is to the trigger pull weights.
The install is just as we did in Part 1 so I will save you the reread, and go straight to the results.
Previous readings on SA were 3lbs. 6 oz. I rechecked the readings today prior to the spring change as I have fired 500 rounds and the additional working of the action his caused it to drop to 3.lbs 1 oz. with the 13 lb. spring, SA post spring change 2lbs. 11.7 oz. so a drop of 5.3 oz for the spring change.


Here is where you will see the most influence of the light spring DA.
Previously we were at 7lbs. 2 oz., now with the lighter spring we register 6lbs. even WOW! 1 lb. 2 oz.
Here is the kicker it is 1 lb. heavier than the stock SA pull.


One last picture, I went to the range a couple days ago and this gem shot the best group I have shot in years.
8 in one hole and 2 flyers at 10 yards, standing, 2 hand grip, slow fire. Sight elevation is perfect! although I do still shoot to the right sometimes.

Terry Mc
Gloss Blue CZ-97BE-SAO

CZ Scorpion CZ Custom Trigger Pack, Streamlight TLR-1HL Primary Arms MD-ADS

CZ75 Shadow 9mm SAO

Offline Genin

  • Full Member
  • ***
  • Posts: 453
Those are some fantastic results. I hope you find more to do to your gun since I thoroughly enjoy reading this thread and your updates.

Offline terry mc

  • Sr. Member
  • ****
  • Posts: 680
Thanks Genin,
I have enjoyed doing this series, I am a modiholic whether it is cars, trucks, motorcycles, computers, or guns, I cannot seam to leave them alone.
Stock is good enough for someone else, ha, ha. Custom is the way I like to make things.

I may look at a couple of little things, but they will probably be minor. I really need to spend more time shooting, at this point the weakest link is me.
I stopped today to shoot a few rounds and could not even come close to the 10 yard group from Tuesday.

Terry Mc
Gloss Blue CZ-97BE-SAO

CZ Scorpion CZ Custom Trigger Pack, Streamlight TLR-1HL Primary Arms MD-ADS

CZ75 Shadow 9mm SAO

Offline Genin

  • Full Member
  • ***
  • Posts: 453
Yeah I know what you mean. It's nice to make something your own. I also need to get my butt in gear and focus more on range time. I'm hoping that within the next month or so I'll be less busy and can start my regular weekly or bi-weekly range trips. That would be great. 

Tuesday's group you posted was really good. I'd be psyched with that.

Offline terry mc

  • Sr. Member
  • ****
  • Posts: 680
PART 7 SA TRIGGER

EXTREMELY IMPORTANT!!!

UPDATED
 I DO NOT RECOMMEND THIS MODIFICATION WITHOUT A CGW SEAR AND HAMMER DUE TO POSSIBLE TIMING ISSUES WITH A STOCK SEAR AND FPB! HERE IS THE PROBLEM, THE STOCK SEAR AND FPB LIFTER ARE DOVETAILED TOGETHER AND WITH THE PRETRAVEL TAKEN UP BY THE TRIGGER IT STARTS THE LIFTER INTO ITS UPWARD MOTION WHICH MEANS THE SEAR HAS STARTED TO MOVE AS WELL, IT COULD BE RECTIFIED BY MODIFYING THE HOOKS ON THE BOTTOM OF THE SEAR BUT THAT PART IS NOT DIRECTLY AVAILABLE FROM TRISTAR FROM WHAT DEXTERGSP WAS INFORMED TODAY.


THANK YOU to DexterGSP for stopping by today so that I could trial fit his sear cage into my gun to see what issues would arrise.

Well guys I have not done anything on the gun in a while so I guess I got bored and needed something to do. Ha, ha!
Actually I have been toying with this idea for a while of converting the C-100 to single action only.
And since I had an old aluminum factory SA trigger from my 9mm SA I decided to give it a shot.

So the usual disassembly applies make gun safe check chamber, remove slide, etc.. because the trigger bar runs under the sear you will need to remove the sear cage and eventually the hammer.
I've gone over the disassembly several times so I will not bore you with it.

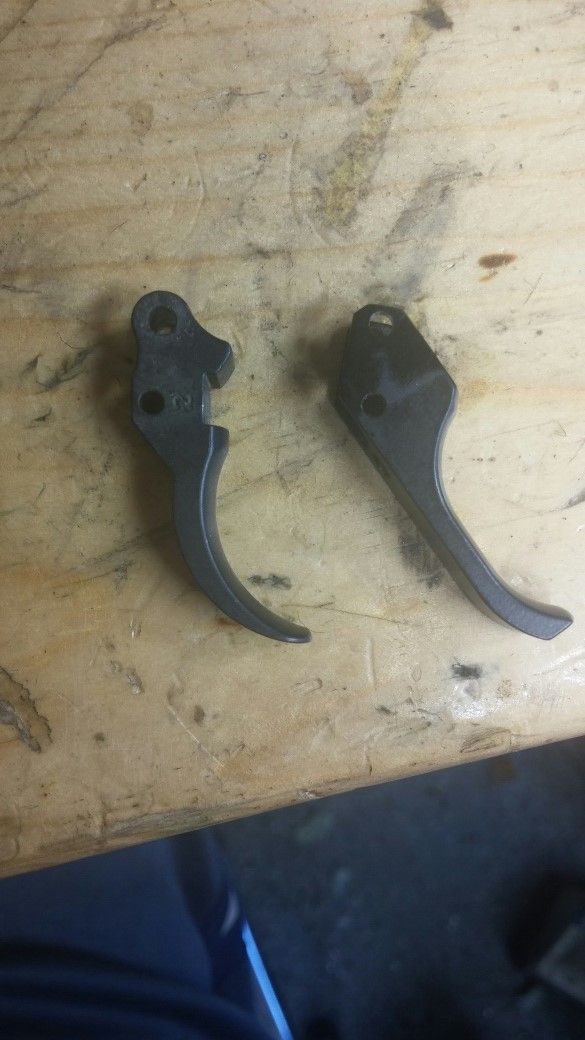
Here is a picture of the stock Canik trigger along side the CZ aluminum SA trigger. What you can see here is on the front of the trigger there is a notch on the double action trigger, this allows the trigger to move all the way forward to reset the double action trigger, if you install the SA trigger it will not move forward enough to reset double action.


The change over requires 2 things, a Single Action trigger and removing the disconnect.

Once you have removed the hammer assembly, you simply remove the disconnect from the hammer by pushing out the pin that holds it on the hammer. Reinstall the hammer and half the job is done.

The other half is installing the trigger, I push out the trigger pin from the frame and lift the front half of the trigger bar and trigger assembly up and out of the frame once the trigger has cleared the slot you will move the assembly forward to remove the trigger bar out from underneath the catches in the frame under where the sear cage sits.

Now that it is removed I push out one pin to disconnect the trigger from the trigger bar.

The new trigger has a task that needs done prior to install.
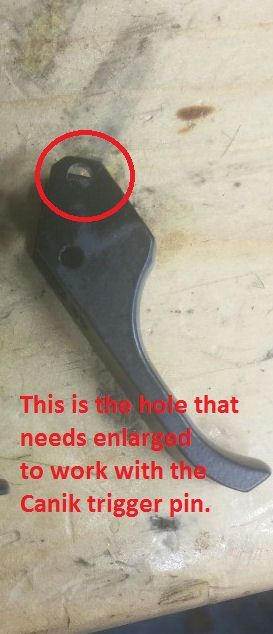
The Canik has a different trigger pivot pin diameter than the stock CZ so the SA trigger will need this hole enlarged to work on the gun.
Use the aluminum or steel SA trigger only do not use the plastic one as I think the removal of the material for the pivot pin will leave to little strength on the plastic one.
I took a caliper and measured the CGW trigger pin and found that it registered 3/32" so I chose tha 3/32" bit from my index and SLOWLY! reamed the existing holes.  MEASURE YOUR OWN DO NOT USE MY DIMENSIONS you can always drill larger you cannot undo drilling too big.
Once I finished drilling it, I found that the CGW trigger pin still was too tight, so again taking my time I slowly reamed the holes again with the bit.


Once the holes would fit the new trigger I went to reinstall it onto the trigger bar and found a second item that needed done.
The cavity where the trigger return spring tucks into the trigger is slightly shallower than the Canik trigger, so when I reinstalled the spring, and the trigger bar, the trigger bar rubbed hard against the trigger return spring causing it to bind up.
So I removed the trigger from the trigger bar and shaved some material from the front edge of the trigger bar following the radius of part allowing enough room trigger return spring inside the pocket. I refitted, checked for binding and all was good.

Now I can reassemble, the hardest part is getting the trigger pivot pin lined up with the slave pin in the trigger and pressing them out.


Before reinstalling the slide I did check a couple of things. I wanted to make sure that the gun would not go automatic without the disconnect assembly as I had been misinformed. I was sure that it would not but you need to be safe about these things.
I cocked the hammer, and rest my thumb on the hammer, then I pull and hold the trigger, you can now rock the hammer forward and back giving credibility to the thought that the gun would now be automatic emptying the clip in short order.
What you have not done yet is check trigger bar, here is the trick. If you push down on the trigger bar while the hammer is floating due to the trigger being held you will hear a small click and you will see the firing pin block lifter pop back up. Now you can release the hammer and it stays cocked.
WHY???
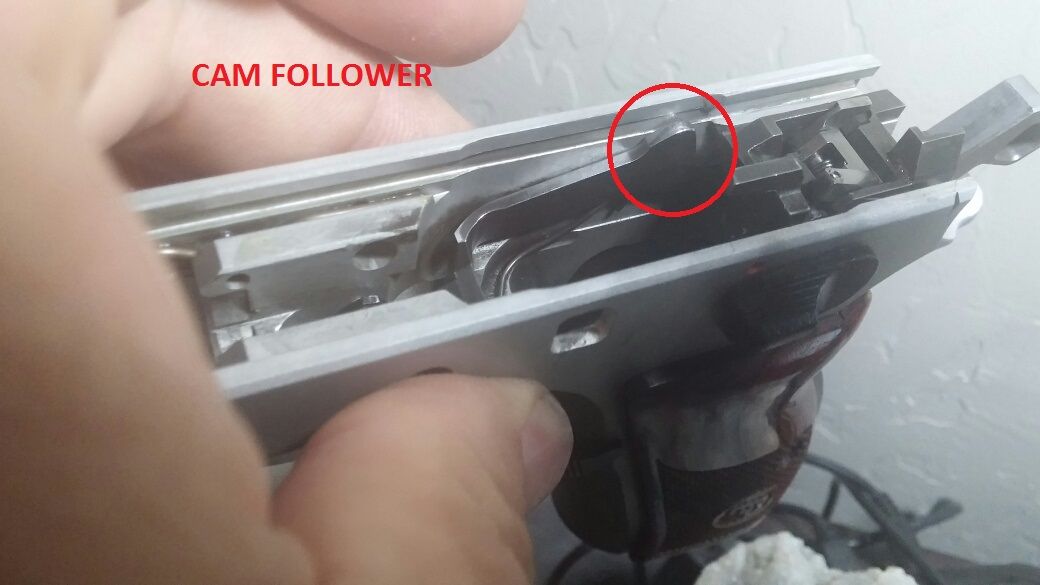
Becasue CZ and the clones have designed a notch in the slide that is timed to allow the hammer to drop when the slide is forward the two bumps on the top of the trigger bar are cam followers, the slide is the cam. as the slide moves back it presses down on the trigger bar, when this happens the sear is reset and the firing pin block lifter is reset. Now the gun is ready to cycle again! end of mystery.

Here is the cam follower on the trigger bar.


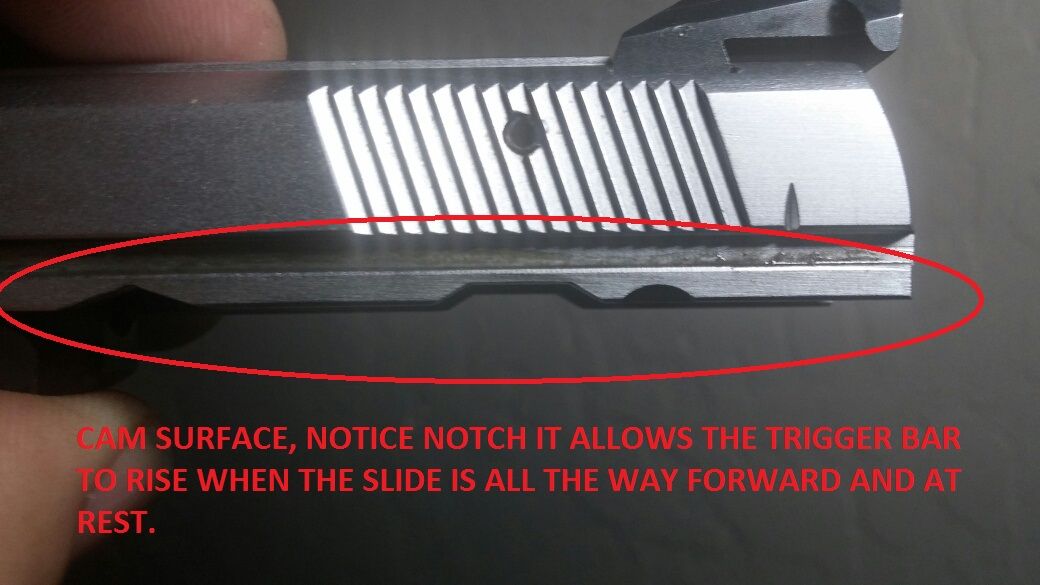
Here is the picture of the notches on the slide, the Center notch is the one for the trigger bar cam follower the front notch is for the slide lock and the back one is for the safety very different jobs from this one.


Okay I now have reattached the slide as I know the gun is safe.
Here is the gun with the SA trigger, it is not glamorous, but it feels good.
Now ehen you cock the gun the trigger does not move because the trigger was already resting at the SA position.
Additionally all pretravel before the FPB lifter coming into action is removed. So the pretravel is shorter and a bigger item is that
all slack on the FPB lifter is gone so THERE IS NO THREE STAGE TRIGGER STACKING! You only have the FPB lifter play and then sear engagement, done.

Here is the finished product,


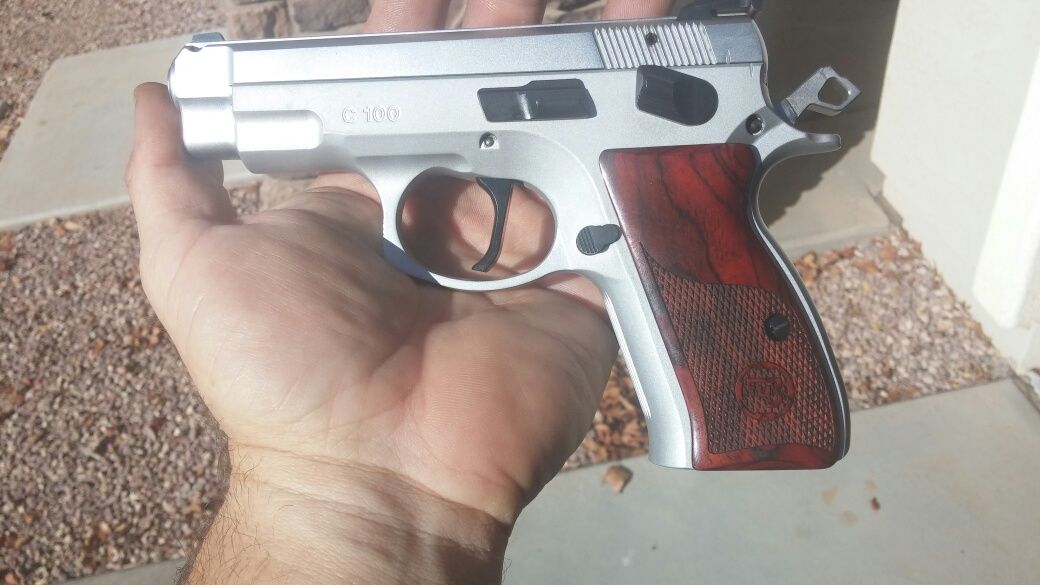
Trigger reach is the same as the stock gun in cocked position and the feel is for all the world like a CZ75B SA with a race hammer, you still have the FPB pretravel but that will only change if you are willing to change to no FPB which I will not for my carry gun. The trigger pull is 2 lbs 11 oz. so really no change there.
I like the shape of the trigger much more than the New style 85C trigger I was running this one does not pinch my finger but as you can see in the picture I have very large hands so this may not be an issue for everyone.


« Last Edit: July 08, 2014, 07:52:02 PM by terry mc »
Terry Mc
Gloss Blue CZ-97BE-SAO

CZ Scorpion CZ Custom Trigger Pack, Streamlight TLR-1HL Primary Arms MD-ADS

CZ75 Shadow 9mm SAO

Offline DexterGSP

  • Full Member
  • ***
  • Posts: 334
Terry, great write up as usual! 

I look forward to doing the mod. with my C100.

Paul
AZCDL and GOA Member

Offline Levinz11

  • Newbie
  • *
  • Posts: 4
Re: Project "C-100" how to smooth a Tristar/Canik Long thread lots of pictures!
« Reply #51 on: September 26, 2014, 09:29:33 PM »
Old thread, I know. But dude, very informative. Mucho gracias! I got an S-120 and it's my first foray into a CZ style gun. Coming from 1911's there sure are a bunch of little springs and pins in there! I had no issues though just following this thread along page by page. Good on you for taking the time to write this up. I installed CGW springs, pins and CZ85 trigger.

If you still check in I have a question...Can you install the race hammer only (instead of the whole kit) if you have removed the FPB and filed down the stock lifter arm?
« Last Edit: September 26, 2014, 09:31:21 PM by Levinz11 »

Offline terry mc

  • Sr. Member
  • ****
  • Posts: 680
Re: Project "C-100" how to smooth a Tristar/Canik Long thread lots of pictures!
« Reply #52 on: September 27, 2014, 12:16:46 AM »
Levinz
First thanks for the kind comments.
Helping others is exactly why I wrote this.
To answer your question, maybe. Ha, ha
The removal of the FPB will get rid of one timing issue, however I have not played with this combination to see if there are other things that you have to deal with.
The sear and fpb lifter have legs on the bottom that time events off of the trigger bow.
It not only impacts the firing pin block but also the double action reset point.
And There is also the problem that the hammer for the Canik is only sold as part of the kit. The standard CZ comp hammers do not fit Caniks without modification as the Canik uses a larger pivot pin.

Sorry it is not conclusive, but the Caniks can take some tweaking when doing modifications. Something that I learned from doing this series.

Another option is DexterGSP has had some good results modifying the stock hammer and sear. I will see if I can get him to comment on his work.
Terry Mc
Gloss Blue CZ-97BE-SAO

CZ Scorpion CZ Custom Trigger Pack, Streamlight TLR-1HL Primary Arms MD-ADS

CZ75 Shadow 9mm SAO

Offline DexterGSP

  • Full Member
  • ***
  • Posts: 334
Re: Project "C-100" how to smooth a Tristar/Canik Long thread lots of pictures!
« Reply #53 on: September 27, 2014, 02:36:24 AM »
My C-100:

I installed the CGW's light trigger return spring and a 15# hammer spring with a light firing pin spring.  If memory serves me correct it dropped the single action pull down a pound from the original springs.  I also did the SA mod and put in a CZ SA trigger.  I cleaned up the sear and the hammer hooks too.  I used a triangle shaped stone and kissed the sear face and the face of the hammer hooks.  I also broke the leading edge of the sear by a thou or two.  Most if not all of us are assuming the fire control parts for the Canik pistols are case hardened so be careful not to get real crazy with a stone.  A lot of people will not touch case hardened parts because they are afraid of blowing through the case hardening, but I've been pretty successful doing it.  Most case hardened parts in in firearm manufacturing is at least .010" thick.  I took down the hammer hooks about .003", which was just enough to get the hooks squared and clean.  I really wouldn't want to take the hooks down anymore than that as it may interfere with the FPB's timing.    The trigger pull in the end was much better than the factory one.  I use the pistol for CCW carry and the trigger is OK I guess.  There's still some creep in it, but much less than it started with.  I have been able to consistently shoot 2" groups with the pistol at 50 feet.

If obtaining parts for this pistol was not an issue I would attempt more modifications with the sear and hammer.  I really don't like Tristar (see my thread about there customer service).  If CZ started to produce a compact in an aluminum frame again I would buy the CZ and sell my C-100.

Paul
AZCDL and GOA Member

Offline Levinz11

  • Newbie
  • *
  • Posts: 4
Re: Project "C-100" how to smooth a Tristar/Canik Long thread lots of pictures!
« Reply #54 on: September 27, 2014, 08:38:38 AM »
I shortened the hammer hooks a hair and polished the sear as well. The trigger pull is great now. There is still that slight stacking (creep) feeling before it breaks but yea, I agree, it's much easier to shoot well with now.

The only reason I want that CGW race hammer is looks, really. The stock Canik hammer is pretty fugly.


Offline terry mc

  • Sr. Member
  • ****
  • Posts: 680
Re: Project "C-100" how to smooth a Tristar/Canik Long thread lots of pictures!
« Reply #55 on: September 27, 2014, 12:19:26 PM »
I shortened the hammer hooks a hair and polished the sear as well. The trigger pull is great now. There is still that slight stacking (creep) feeling before it breaks but yea, I agree, it's much easier to shoot well with now.

The only reason I want that CGW race hammer is looks, really. The stock Canik hammer is pretty fugly.

I agree the stock hammer is ugly and the ring is located in a lower spot on the hammer than CZ's. So for myself I initially got hammer bite out of it.
Flying Brass did a little also but his stopped, and then he was only getting a sore spot from the edge of the beavertail itself.

Also I agree with Paul in that If CZ produced the compact with a safety in alloy, that it would be my first choice. The work I did and all the playing around with several Caniks has pointed out that whether they come from Tristar or from Century that the factory changed a lot of little things and keep making rolling changes so each gun has some small differences (i.e. light rails on Stingrays changing in width, really? why?)  That said I love my little C-100 and since the S.A. conversion I am thoroughly happy with it.
With the hammer and sear from CGW and the S.A. conversion my C-100 is indistinguishable from CZ75B SA with a competition hammer when you close your eyes.
It is really that good.

The slight stacking before the trigger break is the Firing Pin Block, I spent a lot of time checking out the timing with the barrel off and verifying this.
There are 2 ways to remove, 1 as you were talking about is to remove the FPB, the other is what I have done which is the SA conversion.
The SA trigger has less pretravel because the trigger was designed to remove the un-needed travel. This moves the trigger back to the start of the FPB movement, so as soon as you move the trigger you are engaging the FPB, so you do not feel any stacking effect.
Terry Mc
Gloss Blue CZ-97BE-SAO

CZ Scorpion CZ Custom Trigger Pack, Streamlight TLR-1HL Primary Arms MD-ADS

CZ75 Shadow 9mm SAO

Offline flyingbrass

  • Jr. Member
  • **
  • Posts: 37
I did my C-100 the same as DexterGSP.  I polished everything with guidance from this thread and others in this forum.  If you want to learn more how these pistols work, taking one apart and polishing is a good way to learn.

BTW, the tool mentioned by 75plus in the last post of the first page of this thread is well worth making.  See: http://www.czfirearms.us/index.php?topic=51650.msg316253#msg316253  I found an old Dremel bit with an odd-sized shaft was the right diameter,  and I glued it into a small piece of wood dowel to provide the correct spacing.  It works as advertised.  With the tool in place, the end of the mag brake will squeeze into place even using the aftermarket 15 lb spring on my C-100, though you need to wiggle the spring around some to get it in there.  Great, simple tool.  Either make one or alter your mag brake.  Take your pick.

To begin with:
Polishing job
15 lb. mainspring
Reduced power firing pin spring

Results:  For those who care about DA (I don't, but left the parts in anyway), it was much smoother.  Still felt some hitches in the SA pull,  and the SA weight wasn't improved very much.

We drilled a CZ SA trigger, intending to use it, but after handling Dexter's pistol I noticed the reach is not the same as the stock trigger.  Sure enough, comparing the triggers with toothpicks stuffed through the pin holes to align them, the surface that your finger touches is farther forward on the SA trigger.  I couldn't measure, but I'd say somewhere between 1/16" and 1/8".  That doesn't sound like much, but it is in feel.  Those who have fairly large hands may not notice, or may even appreciate, the longer reach, but for me the SA trigger feels too far forward.  So, for now I'm sticking with the stock trigger.

The stock trigger return spring was very hefty.  In Round 2 we replaced it with the lightweight version from CGW, and at the same time cleaned up the sear face, keeping the same angle.  Also gave the sear a "relief" style cleanup/squaring on the very edge.  Also polished up the hammer ledge, again keeping the original angle.  This made quite a difference in the SA pull weight.  Going by feel, 1/2 lb, likely a bit more, reduction.  I don't know how much was from what.  I suspect the lighter trigger return spring is responsible for most of it.

The end result is pretty much the same as Dexter's trigger, so this process is repeatable.  SA still has some occasional hitches in the pull, near the beginning (not as rough as before), but I think that is to be expected given the limited ability to alter these parts.  You have serious positive rake occurring, plus slop in all the parts.  And, you can't take much off of anything.  It's not a match trigger, or anywhere near as nice as Terry's (and I have felt his), but is a considerable improvement over stock.  I suspect these mods are the best one can do with these pistols to get the best "bang for the buck" on a limited budget.

DA, for those who care about it, is now pretty nice for an auto, so I have been told.  In my opinion it's on par with an untuned S&W revolver both in weight and smoothness.


Offline Walkman

  • Newbie
  • *
  • Posts: 11
Great thread, Terry!  Thanks for sharing your modification process.  I plan to do some of these to my C-100 as well.
Walkman
_____________________________________________________________
In Memoriam:  John Moses Browning (1855-1926)

Offline terry mc

  • Sr. Member
  • ****
  • Posts: 680
You will love it!
Terry Mc
Gloss Blue CZ-97BE-SAO

CZ Scorpion CZ Custom Trigger Pack, Streamlight TLR-1HL Primary Arms MD-ADS

CZ75 Shadow 9mm SAO

Offline terry mc

  • Sr. Member
  • ****
  • Posts: 680
Just decided to ad an updated Picture.
I have changed a couple things around.

I have done a modified SAO Straight Blade trigger.
I only put this in because it is what I tend to have in my other guns.
I like the look and the consistency of feel between the guns.

The process is the same as the SA trigger with enlarging the hole.
There is one caveat with the Flat trigger, it has a pretravel screw and that is very useful if you remove the firing pin block.
When you leave it in though, you have to be careful about not taking out too much pretravel out of the trigger.
Having done this addition before I am aware of the limitations.

There is a problem that people do not initially realize.
You have to check the trigger reset, cocking the hammer while the trigger is HELD BACK.
This simulates the action of the slide cocking the hammer, once the hammer is cocked release the trigger.
If there is not a click, the trigger did not reset! This means when you fire the gun the first round will fire and after that the trigger will not reset.
Not the best scenario in a life or death situation. You can pull the trigger it just does not do anything.
If you have this you back out the pretravel and retest until you feel a click. Then when you pull the trigger the hammer will fall as it should.

Another change is I went from the Cocobolo grips to the standard CZ rubber grips.
They screwed right on with no manipulating or modifications.
And lastly in this picture you can see one of Joes stainless baseplates on the standard Canik magazine.

I may later change the frame to black for a less conspicuous look while maintaining the usefulness of the hard chrome slide.

Here is a picture of the current state.


Terry Mc
Gloss Blue CZ-97BE-SAO

CZ Scorpion CZ Custom Trigger Pack, Streamlight TLR-1HL Primary Arms MD-ADS

CZ75 Shadow 9mm SAO