Author Topic: Shadow Trigger Job ending with 4#DA  (Read 136002 times)

0 Members and 1 Guest are viewing this topic.

Offline nothing

  • Jr. Member
  • **
  • Posts: 74
Shadow Trigger Job ending with 4#DA
« on: September 18, 2011, 08:49:37 PM »
After reading everything I could on trigger jobs from this forum and a couple of others I embarked on working my Shadow Custom Target's trigger. Each piece of advice really helped, but it didn't seem to complete the job until I put it all together. I ended up with about a 4DA/2SA trigger.

Tools needed:
1/16th starter punch w/hammer
3/32nd punch
1/16th punch
1/8th punch
dental pick
needle nose plyers
sandpaper: 400, 600, 800, 1000
glass plate and removable adhesive
sharpening stones (I prefer ceramic) If using water or oil stones be sure they are flat
Dremel with felt bob and polish and cutting wheel
Q-Tips
Rem-Oil
Grease

During disassembly the only part you that will need a hammer or mallet to drive out is the trigger pin. Everything else should move out with minimal force.


Field Strip and remove grips


Remove magazine plate


remove mainspring and plunger by applying pressure to the bottom of the plunger and pushing out the pin


Remove Safety and Sear Cage by lifting the sear spring from the groove and easing the safety out. It might help to pry with a firm piece of plastic to get it started. If you have to force it out something is wrong, check the spring again.


Remove the right safety detent to keep it from disappearing when you remove the trigger


Remove the hammer, strut and disconnector by lifting up on the retaining pin and pushing out the hammer pin


Remove the Trigger by beating the hell out of the pin with a 1/16th starter punch. I highly recommend replacing it with CGW floating pin. The pin will not be pretty when you get it removed so be sure you have an extra to replace it with just in case. Be sure to cover the trigger return spring with something to keep it from flying away when you back the punch out. I like to just turn the pistol upside down on the towel and place my finger behind the top of the magwell. The CGW pin is shown.


Back the trigger pin out to remove the trigger


Remove the firing pin by depressing the firing pin in with a punch and sliding the plate off.  Slide the firing pin and spring out.


Disassemble the sear cage by pushing the pin out and separating the two parts. Remember not to let the spring get away from you.


This concludes disassembly.

Offline nothing

  • Jr. Member
  • **
  • Posts: 74
Re: Shadow Trigger Job ending with 4#DA
« Reply #1 on: September 18, 2011, 08:50:54 PM »
A word on smoothing parts: Go slowly and keep everything flat and square. Sandpaper must be attached to a flat surface. If it isn?t it will round off the sides of parts.  Glass works well, but granite or even MDF can be used as well. There is no need to apply pressure to the parts, just let them glide lightly across the sandpaper or stones. Do not let the metal get hot as it can adversely affect the temperament of the steel. Warm is OK, but hot is a no-go.  When using the dremel pay close attention to the temperature since it can heat up the metal quickly.  It takes a light touch with it as well.

The first part to work is the trigger bar and trigger. Using sandpaper stuck to a glass plate begin working the sides of the trigger and trigger bar moving in increments from 400 through 1000 grit. There will be some deep machining marks left, but as long as it?s smooth it?s fine. Don?t? forget to polish the small area on the trigger bar that attaches the trigger.
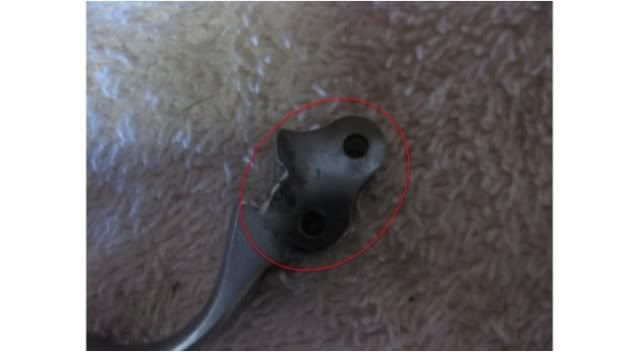
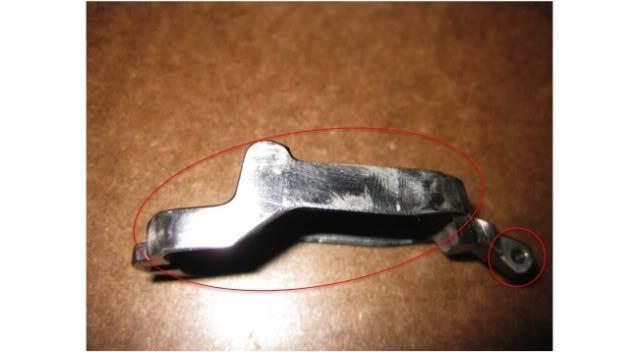


Polish the bottom. Don?t forget the grooves.
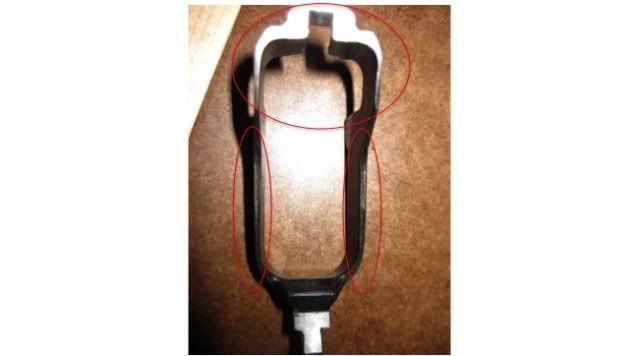


Polish the top. You can rub the bulk of it on a glass plate or stones, the rest just attach some sand paper to a small file to get in the small areas. Don?t attempt to get rid of all the machine marks, particularly on the lower part. Remove just enough material to help the disconnector glide.
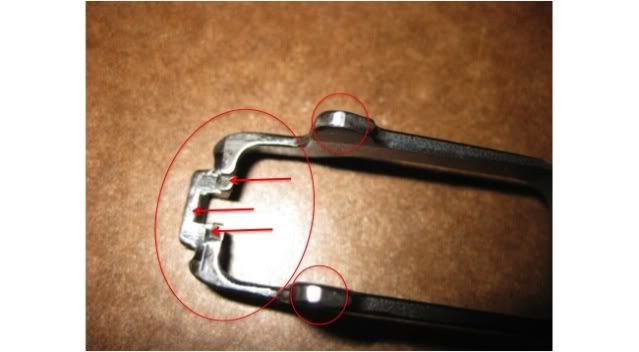


Smooth the two points where the ears of the disconnector engage. Again it won?t be perfect, but you want to remove the overall friction points.
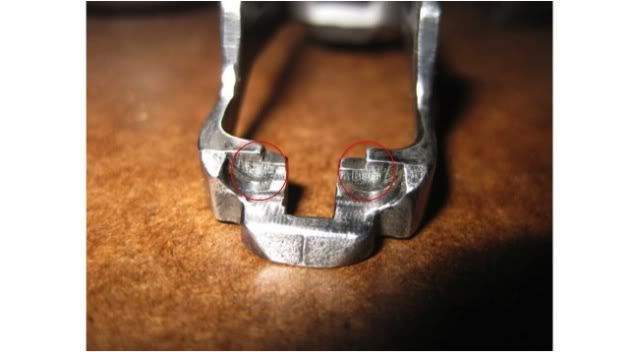


Use the dremel with the feltbob and polish to finish buffing the triggerbar.

Smooth the sear cage and the sear. I used a ceramic stone set for this. Sandpaper would work fine also. I just trust the ceramic more with keeping the back of the sear flat.  I also smoothed the middle of the sear cage where the top of the disconnector touches.  Finish the sear cage with a light touch from the felt bob. I didn?t use the dremel on the sear since I want to make sure it?s absolutely flat with no rounded edges.
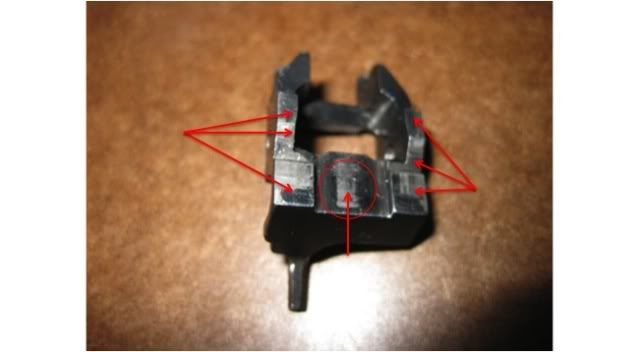
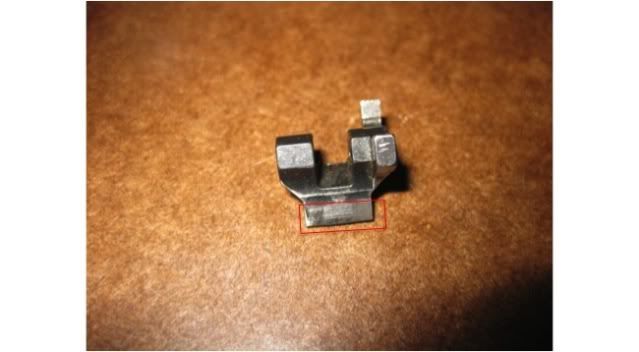


Polish the sides of the hammer making sure you stay clear of the hooks. Also polish and round the hammer strut to ensure the mainspring rides smoothly.  I also polished the hammer pin. Finish up with the dremel


You can smooth and polish the disconnector without removing it from the hammer. Use a small file with sandpaper attached. Be careful to stay clear of the hammer and hooks.  Don?t take off too much material. You?re just trying to make it a little more slick.

Top of disconnector
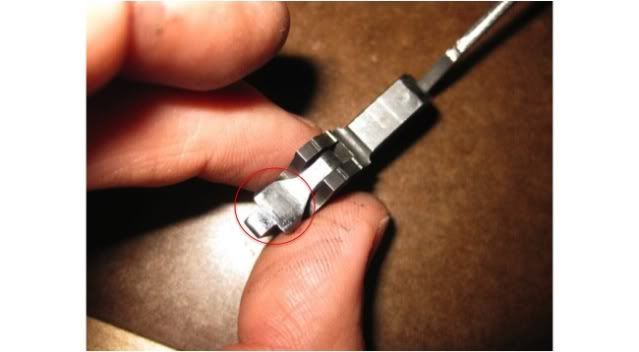


Bottom of disconector, smooth the ears and the tip that drags along the frame as well
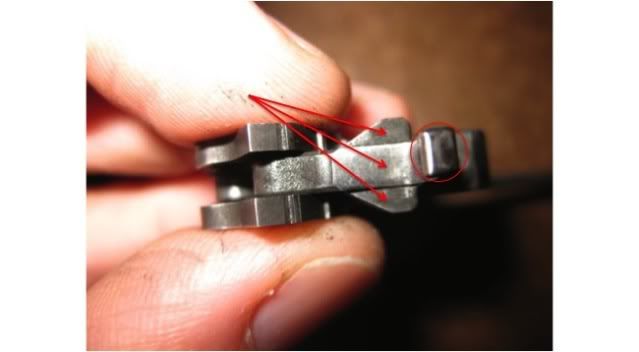


Finally lightly smooth the front of the ears. Just as before don?t take off too much material. Just try to knock down the high spots a little.
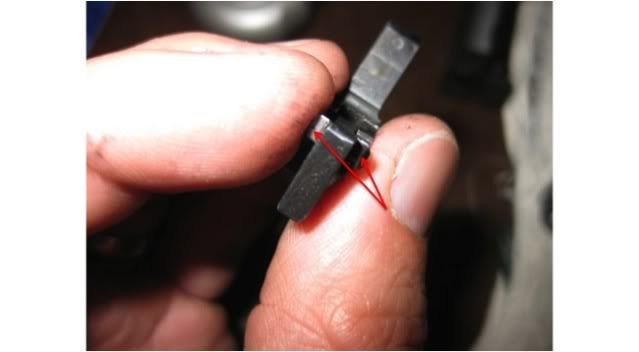


Lightly smooth the rear of the frame where the disconnector glides. Be careful not to round the edge. Take off just enough material to the point it feels smooth, don?t try to give it a mirror finish. I went up to 1000 grit, but didn?t remove the heavy machining marks.

On a side note, machine marks that are parallel with the direction of travel act as serrations and actually help reduce the amount of friction due to less material making contact with the surface.


Smooth the tops of the trigger lifter spring with sandpaper. Also note the magazine spring screw. If the trigger reset seems to be a little long it could be because of too much tension on the lifter spring. Backing off the screw will make the rebound seem less turbulent when the trigger bar lifts on the rebound.
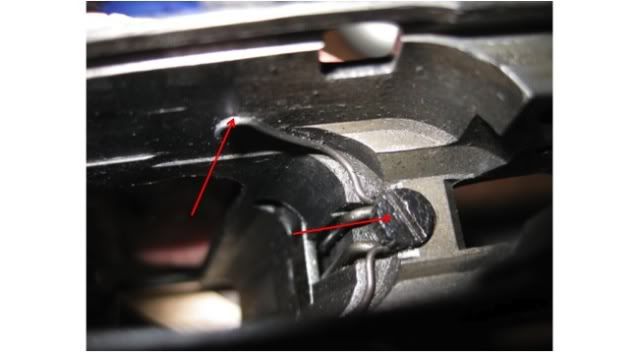


I also lightly dremeled the firing pin with the felt bob and the inside of the frame where the trigger bar fits.  The intent is to knock off any burrs or rough spots, not to polish the areas. You can also do this with the hammer pin and trigger pin.

Before reassembling the small parts give the polished areas a thin coat of Rem Oil or similar. Be sure to clean all the parts to ensure the metal shavings are gone and won?t contribute to corrosion.

« Last Edit: September 18, 2011, 10:40:05 PM by nothing »

Offline nothing

  • Jr. Member
  • **
  • Posts: 74
Re: Shadow Trigger Job ending with 4#DA
« Reply #2 on: September 18, 2011, 08:52:23 PM »
To reassemble just follow the reverse order.  Use the hammer pin retaining pin to act as a slave pin when inserting the trigger and trigger bar. It will hold the trigger return spring  in place. Insert the rear of the trigger bar first and then slip the trigger in.


When assembling the sear cage I make a slave pin out of a cut q-tip and use it to hold the sear spring in place while inserting it into the cage.  The Main Spring pin and the Sear pin are similar in size. Be sure to use the longer pin in the sear.


Before inserting the Hammer assembly back in place put a light coat of grease on it. I like regular slide glide but any gun grease would work. It will help dampen the spring (you won?t feel the vibration in the grip when the hammer releases) and reduce friction during the DA Pull.


To insert the safety I place the right side in first. Then I work the left side in until it barely engages the right side. At this point use a dental pick to pull back on the left detent until the safety snaps in place. Then push the sear spring back into the channel on the safety. Forgetting to do this will cause it to come lose while shooting (ask me how I know).


Tuning the springs for trigger pull:

The biggest factor in the DA pull is the mainspring. Cutting coils from the MS will reduce the pull weight, but it can also affect setting off primers. On 13# spring I cut off 4 coils and ended up with a 4#13oz pull that still set off federal primers. Main Springs can also be smoothed on the inside to reduce the friction on the hammer strut and turned down (thinned) to reduce the pull without having to cut coils.

To increase reliability you can tune the firing pin spring a little and add an extended firing pin. My firing pin spring was already tuned by CZ Custom and was significantly shorter.  I have the reduce spring from CGW, but haven?t tried it yet. It?s a much longer spring than the CZ Custom tuned spring.

After installing Cajun Gun Works 8.5# spring my DA pull is around 4#3oz based on a 10 pull average. I made no modifications to this spring.

The trigger return spring has more of an affect on the SA Pull. By bending the legs further away you can reduce the tension. Bending too much will cause the trigger not to return. Be sure to keep the spring channels on the trigger bar lubricated with a lightened trigger. A drop of Rem oil works well.


DA pull


SA pull


Offline recoilguy

  • Hero Member
  • *****
  • Posts: 2057
Re: Shadow Trigger Job ending with 4#DA
« Reply #3 on: September 18, 2011, 09:10:46 PM »
Wow nicely played ...............very nicely documented....this should be a big help to someone!!!!

RCG
Its easy being a communist in a free country
What's hard is to be free in a communist country

Offline Stuart

  • Moderator
  • Hero Member
  • *****
  • Posts: 8621
Re: Shadow Trigger Job ending with 4#DA
« Reply #4 on: September 18, 2011, 09:24:24 PM »
very nice step by step.

lots of good information and tips.

Offline justaute

  • Full Member
  • ***
  • Posts: 248
Re: Shadow Trigger Job ending with 4#DA
« Reply #5 on: September 19, 2011, 01:43:09 AM »
Nothing...very, very nice work here.  Wow.

I definitely like that 2/2.25# SA pull-weight.


Online coolbox

  • Hero Member
  • *****
  • Posts: 2127
Re: Shadow Trigger Job ending with 4#DA
« Reply #6 on: September 19, 2011, 04:14:04 AM »
Excellent share Nothing. I am sure the results, and satisfaction, is worth much more the effort!

What was the SA/DA rating before the job?
Life is too short to waste on a bad trigger pull

Offline schmeky

  • Hero Member
  • *****
  • Posts: 2897
Re: Shadow Trigger Job ending with 4#DA
« Reply #7 on: September 19, 2011, 08:59:55 AM »
Nothing,

Great tutorial.  Great pics for everyone.  I just wanted to mention that you can reduce the DA pull weight by cutting coils from a heavier spring, but the best method is to retain the springs OAL and use a smaller diameter wire.  This is what I have done with my 8.5# spring, as well as my 11.5# spring.  This is the same principal behind my firing pin spring, it's longer, but it's also much lighter.

The trigger pin has been a big seller for CGW.  To bad CZ doesn't do this from the factory.

Again, great job!!!

Offline nothing

  • Jr. Member
  • **
  • Posts: 74
Re: Shadow Trigger Job ending with 4#DA
« Reply #8 on: September 19, 2011, 09:50:42 AM »
Thanks for the kind words everyone. If it wasn't for folks like ya'll posting all your tips and tricks I really doubt I would have had the same results. I also really  appreciate Stuart and Schmeky taking the time to answer a couple of dumb questions for me. Schmeky, your trigger pin and 8.5# spring are both like magic. I would have gone through 8 trigger pins messing with this thing if I hadn't bought yours.

Coolbox, it came set at just under 8DA/4SA. It was obvious CZ Custom had done a little work to the action and springs, but I figured it needed a little more. By just cutting the 13# MS I was only able to drop the DA to about 6.5#. That same spring now breaks just under 5# after doing all the work to the action. After chucking it in a drill press at 200RPM and running a piece of rolled up 1000 grit sandpaper through it for about 20 seconds it broke at 4.5#. The 8.5# and 11.5# spring is really the way to go since you don't have to cut it.

After I worked over a part I would put the pistol back together and test the function and check the pull weight. With each part I noticed a slight reduction in weight and each contributed to the smoothness of the action. The biggest drops in pull weight and affect on the feel of the action seemed to come from polishing the sides of the hammer and highlighted areas of the trigger bar.

Offline Stuart

  • Moderator
  • Hero Member
  • *****
  • Posts: 8621
Re: Shadow Trigger Job ending with 4#DA
« Reply #9 on: September 19, 2011, 10:44:47 AM »
I am very jealous of your results...very very nice.
what primers are you able to use at this trigger weight?


Offline nothing

  • Jr. Member
  • **
  • Posts: 74
Re: Shadow Trigger Job ending with 4#DA
« Reply #10 on: September 19, 2011, 11:50:26 AM »
Stuart, so far I've only shot federal primers as I've been reloading with them exclusively for the past year. I have 300 rounds on the 8.5# spring with 100% ignition. I've got to make a trip to the store this afternoon so I'll pick up some CCI and Winchester primers to see how they run. I'm leery about getting the CCI to run, but maybe the Winchester will work. I will take a couple of other springs with me to test.

Offline schmeky

  • Hero Member
  • *****
  • Posts: 2897
Re: Shadow Trigger Job ending with 4#DA
« Reply #11 on: September 20, 2011, 03:20:12 PM »
Nothing,

There is no such thing as a dumb question on this forum.  No one was born knowing how a firearm works.  I like to thing we are all learning and sharing.   Thanks for sharing your results with us.

Offline Houndog

  • Newbie
  • *
  • Posts: 4
Re: Shadow Trigger Job ending with 4#DA
« Reply #12 on: September 21, 2011, 07:44:19 PM »
Nicely done Nothing  8)

Offline Supergyro

  • Jr. Member
  • **
  • Posts: 31
  • Proud Pre-B Owner
Re: Shadow Trigger Job ending with 4#DA
« Reply #13 on: September 21, 2011, 11:02:10 PM »
Very nice, thanks a lot Nothing. There is a lot of stuff I will try on my Pre B.

Offline 1SOW

  • Hero Member
  • *****
  • Posts: 15006
  • GO GREEN - Recycle 9MM
Re: Shadow Trigger Job ending with 4#DA
« Reply #14 on: September 22, 2011, 09:02:21 PM »
Truly impressive.  Thank you.